Well, truth be told, we never left...just relocated.
My last post was regarding me working on the handrails for the lid deck. That was an important detail as it makes spending time up on the roof much safer, and makes the boat that much larger. The handrail was finished, the boat went back in the water for the season, and boat building ceased.
Boat building had pretty much ceased for the winter of 14/15, and my focus shifted to working on our house getting it ready to list for sale. Shannon was still in school finishing up her respiratory degree so I began pecking away at a long to do list on the house. Some projects were substantial, some were not. The bottom line was I devoted about five months of steady work, and sometime about the end of May, 2015, we listed the house on one of those online " for sale by owner sites ". Three weeks after listing the house, we had an offer, and a week after that we had a deposit with a move out date agreed upon a week or so later. Fast forward a fuzz and we ended up in Cape Coral, Florida
Moving the boat to Florida began in late October of 2015, and was done by me and a friend Pat. The route to Cape Coral was as follows: The Ohio River, to the Cumberland River, to the Tennessee River, to the Tennessee Tom Bigbee River, to the Black Warrior River, to the Mobile River in to Mobile Bay, East on Gulf Coast Inter coastal water way, cross the Gulf of Mexico from Panama City to Ft. Myers Florida where we now harbor the boat at the Ft. Myers Yacht basin. The trip was about 2000 miles, and took a couple of months as we left the boat a few times to return to family.
So here I sit in Cape Coral, Florida typing this blog update and I'm still working on finishing the boat. There are a few big projects that need to be finished, and I plan on documenting these projects on the old boat build blog.
Cheers,
Conall
Saturday, April 16, 2016

Sunday, February 15, 2015
Handrails and winch battery box
Winter is not wanting to let go of our small Ohio river town, so no work has been finished on the roof of our boat. As I sit here and type these words, a forecast for 7"-11" of snow, high winds, and close to zero degree temperatures is playing from my radio giving us the promise of an interesting day tomorrow. The mid range forecast has temperatures staying in the teens and low 20's for the next ten days, so the snow we're going to get tonight is going to stick around for a while. "In like a lion, out like a lamb" was how March was described to me while I was growing up. 
So while continuing painting rooms in the house, I've managed to get some boat work done in the shop with material I've had stockpiled. The handrail fabrication was the first job I wanted to get finished, and for the most part, went pretty smooth. The handrails are made of 3/4" schedule 20 stainless steel pipe. I want to paint the rails, and while cost could have been lowered with mild steel, using stainless pipe will be better in the long run in regard to maintenance. Because of cost, pipe was used vs tube, and because of weight, thin walled pipe was used. Wall thickness on schedule 20 is about .095 so MIG welding and stick welding is easily used.
The handrail will be 36" tall, with the stanchions being 24" on center. The stanchions centers could have probably been stretched to 36", but 24 is what I laid out when I was framing the roof, and the doubler pads are already welded in place. Once I post about the handrail install, you'll see what I'm talking about regarding doubler pads. The stanchions were cut to length on the lathe using a parting blade, and a stop to make sure they are all the same length. To make fit up idiot proof, I coped each stanchion to fit the rail. Some people call it notching, I call it coping, but what ever you call it, I accomplished this by using my mill and an annular cutter. An annular cutter , or a rotary broach, as some call it is nothing more than the baddest assed hole saw you've ever seen. The 3/4" shaft of the cutter with flats milled in it, are really designed to be used in a mag drill with it's specific chuck, but I was able to use a collett to hold the cutter in the mill. The pipe is beefy enough to be held in the mill vice, and the key to doing this coping is an extremely slow feed. Rigid holding of the part, a sharp tool, and a slow feed gave me top notch results.
Because the rail is going to be painted, I was able to MIG weld it. The mast boom is being secured right now by hooking it to one of the cleats use to lift the wheel house last year. I never got around to cutting off the cleats, and darn if they've not come in handy for securing the kayaks, and in this case, also the boom. It made sense to me to weld a couple of stanchions to the hand rail over a mounting stanchion to be able to rest the boom and snatch it down with the cable.
Because we're using electric winches to control the load and the boom, a battery box had to be built for the battery. To help keep things out of the weather, I hinged a lid to the box. The box has a partition in it to hold the battery on one side, and on the other side house the motor solenoids, the motor fuse's, and a positive and negative buss bar. The motor fuse's are 50 amp inline, and came without a cover of any sort. I really did not like having two hot posts unprotected, so I used an orifice shield for pipe to cover the posts of the fuse's .

The battery I'm using came out of my "slightly used, but still OK " inventory I keep in the back of the shop, and is a group 31. This battery is not going to get heavy use, but I still had to decide how to keep it charged. The choices were charger in the wheel house with heavy wires. Heavy wires from the house bank with no battery on the roof. AC wires to the roof, with charger in the roof top box. Solar panel to charge the battery. I chose a solar battery charger.
The solar battery charger is 1.5 watt, and it's my understanding that with this low wattage, I won't need a charge regulator. I don't know what type of panel this thing is, but in my shop with the panel just seeing shop lights, it puts out 12 volts. When I move the panel outside and it's shady, it puts out 21 volts. When the panel see's sunlight, it puts out 23 volts. The panel came with a small diode light on it that blinked when it was charging, but that blinking caused the voltage to pulse erratically when no sun was shinning, so I took the panel apart and cut the wire lead to the diode light. With the light not blinking anymore, the voltage was steady. I might as well say now, that this panel cost $14.00 , and has nothing but great customer reviews. For the three days I had it connected to the group 31, it held the charge steady at 13.2 volts.
The whole electric winch thing might come back to bite me in the butt some day, so I should probably have a few manual blocks and tackles on board. But truth be told, for how low the winch's cost, I should probably have a spare winch on board. While the winch's are of low cost, they seem to be put together well, and appear to be weather tight. Once they're wired and operational, I'll probably cover them with something water tight, and keep things up to snuff.
In two weeks, the boat yard opens for season hours. In ten weeks, the harbor opens for business , and we'll be in the water. There's no way I'm going to have my off season boat "to do" list completed, but that's OK. D day for me to have the real list complete is late June, when the plan is to motor to Kentucky lake.
Cheers
So while continuing painting rooms in the house, I've managed to get some boat work done in the shop with material I've had stockpiled. The handrail fabrication was the first job I wanted to get finished, and for the most part, went pretty smooth.
The handrails are made of 3/4" schedule 20 stainless steel pipe. I want to paint the rails, and while cost could have been lowered with mild steel, using stainless pipe will be better in the long run in regard to maintenance. Because of cost, pipe was used vs tube, and because of weight, thin walled pipe was used. Wall thickness on schedule 20 is about .095 so MIG welding and stick welding is easily used.The handrail will be 36" tall, with the stanchions being 24" on center. The stanchions centers could have probably been stretched to 36", but 24 is what I laid out when I was framing the roof, and the doubler pads are already welded in place.
Once I post about the handrail install, you'll see what I'm talking about regarding doubler pads. The stanchions were cut to length on the lathe using a parting blade, and a stop to make sure they are all the same length. To make fit up idiot proof, I coped each stanchion to fit the rail. Some people call it notching, I call it coping, but what ever you call it, I accomplished this by using my mill and an annular cutter. An annular cutter , or a rotary broach, as some call it is nothing more than the baddest assed hole saw you've ever seen. The 3/4" shaft of the cutter with flats milled in it, are really designed to be used in a mag drill with it's specific chuck, but I was able to use a collett to hold the cutter in the mill. The pipe is beefy enough to be held in the mill vice, and the key to doing this coping is an extremely slow feed. Rigid holding of the part, a sharp tool, and a slow feed gave me top notch results.Because the rail is going to be painted, I was able to MIG weld it. The mast boom is being secured right now by hooking it to one of the cleats use to lift the wheel house last year. I never got around to cutting off the cleats, and darn if they've not come in handy for securing the kayaks, and in this case, also the boom.
It made sense to me to weld a couple of stanchions to the hand rail over a mounting stanchion to be able to rest the boom and snatch it down with the cable.Because we're using electric winches to control the load and the boom, a battery box had to be built for the battery. To help keep things out of the weather, I hinged a lid to the box. The box has a partition in it to hold the battery on one side, and on the other side house the motor solenoids, the motor fuse's, and a positive and negative buss bar.
The motor fuse's are 50 amp inline, and came without a cover of any sort. I really did not like having two hot posts unprotected, so I used an orifice shield for pipe to cover the posts of the fuse's . The battery I'm using came out of my "slightly used, but still OK " inventory I keep in the back of the shop, and is a group 31. This battery is not going to get heavy use, but I still had to decide how to keep it charged. The choices were charger in the wheel house with heavy wires. Heavy wires from the house bank with no battery on the roof. AC wires to the roof, with charger in the roof top box. Solar panel to charge the battery. I chose a solar battery charger.
The solar battery charger is 1.5 watt, and it's my understanding that with this low wattage, I won't need a charge regulator.
I don't know what type of panel this thing is, but in my shop with the panel just seeing shop lights, it puts out 12 volts. When I move the panel outside and it's shady, it puts out 21 volts. When the panel see's sunlight, it puts out 23 volts. The panel came with a small diode light on it that blinked when it was charging, but that blinking caused the voltage to pulse erratically when no sun was shinning, so I took the panel apart and cut the wire lead to the diode light. With the light not blinking anymore, the voltage was steady. I might as well say now, that this panel cost $14.00 , and has nothing but great customer reviews. For the three days I had it connected to the group 31, it held the charge steady at 13.2 volts.The whole electric winch thing might come back to bite me in the butt some day, so I should probably have a few manual blocks and tackles on board. But truth be told, for how low the winch's cost, I should probably have a spare winch on board. While the winch's are of low cost, they seem to be put together well, and appear to be weather tight. Once they're wired and operational, I'll probably cover them with something water tight, and keep things up to snuff.
In two weeks, the boat yard opens for season hours. In ten weeks, the harbor opens for business , and we'll be in the water.
There's no way I'm going to have my off season boat "to do" list completed, but that's OK. D day for me to have the real list complete is late June, when the plan is to motor to Kentucky lake.Cheers
Thursday, January 22, 2015
Mast installation
Along with no ice on the boat roof, and a break in the weather, I decided to install the mast. Unlike most things boat building, this particular phase of the project actually went fairly smooth and took about as long as I figured. Getting all the parts and gear loaded on the truck took as much time as the actual installation.

I don't know what the mast weighs, but I'd have to guess around 150 lbs. Getting it up on top of the boat was a simple matter of leaning it against the boat above the swim platform and with me on top, and with my helper lifting from the bottom, we quickly had it on the roof.
 The layout work for the pins and bushings was spot on, so it was a simple matter of first installing the upper pins and bushings, heavily tack welding the bushings ( with the pins in place ), standing the mast up, then heavily tack welding the lower bushings in place. Once everything was tacked in place and I verified the pins were not in a bind, it was final welded with a stick machine.

If push comes to shove, a stout person probably could step the mast by himself. Once the mast is standing, it's just a matter of getting the fore and aft thing just right so the bottom locking pin can be pushed home. I should probably turn a pin with a heavy chamfer on it so it's self aligning and can easily be driven home while one person both holds the mast up and drive's the pin home. For the sake of safety, it's a two person job, but like I said, if push comes to shove, one person probably could handle it.

Having never really been on a boat with a mast before, once we had it welded and standing in place, it seemed ginourmous. I know 20' isn't squat when talking about sailboats and mast, but standing on my roof while looking up at the mast, it seemed to be way up there. With the mast standing unstayed, and me pushing on it, there was a little flex in the framing. The turnbuckles I used were capable of taking up 6". Pulling the cables as tight as we could by hand, then swagging the thimbles to the turnbuckle eyes left what appeared to be a decent sag in the cable. Once we had the three stay cables rigged, I was impressed by how little it took to tighten them up. I should have probably measured, but I don't think we took up more than 1 1/2" before the cables were as tight as I thought they needed to be. I'd like to hear from one who knows about how tight these cables need to be, but to me they feel pretty comfy. The two shroud cables are about five degrees off of 90 degrees to the mast, so the fore stay cable pulls against the shroud cables. Shrouds are athwart-ship while stays are fore and aft. With the cables tensioned, the mast now felt rock solid.

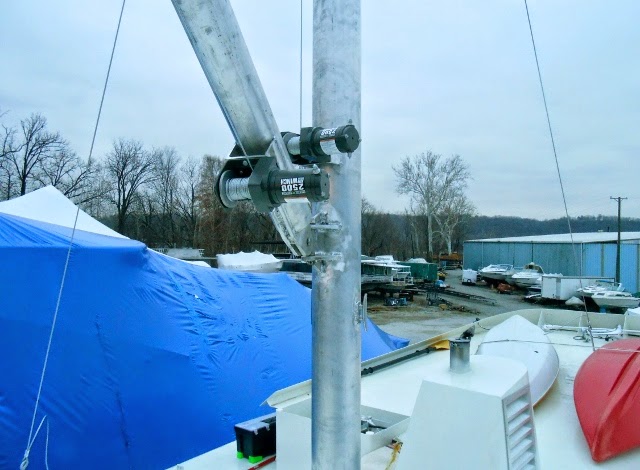
Having spent the last three weeks fabricating in the shop and dry fitting everything together, getting the boom in place and rigging the electric winches took practically no time at all. Using a spare battery from the shop to temporarily electrify the winches, we were finally making things go up and down. We played around for a short time and hoisted the 200 lbs generator to the roof and back down. The winches are remote controlled, and have different frequencies, so that's going to make things easier.

To wrap up this project, I need to build a dedicated battery box and decide how I'm going to charge the battery. All the solenoids, and fuses for the winches will go in the battery box. I'll probably build the box big enough to hold some tools slings for lifting. I'm leaning towards a dedicated winch battery vs pulling heavy wires from the main distribution panel.
A wire chase is already framed from the wheel house to the mast step, so getting wires to that point will be easy. I have a 6x6 splice box already on the mast step, and this will be my transition from interior to exterior. I'll make water tight connections in the splice box and bring cord out of the splice box using cord grips. I don't think I'll be able to do this with the radar cord, so a custom split cord grip will have to be used.

The heavy work is finished on this project and I'm pretty happy with how it's turned out. I'm going to finalize fabricating the wiring harness's for the winches and getting a battery box built so I can use the hoist for the hand rail build. most of the hand rail will be fabricated and welded in the shop so I'll use the boom to hoist the three sections along with holding them in place while I weld the rail to the roof. It will also be nice being able to hoist the welder to the roof. Heck I might even bring the big MIG welder down to do this job now that I can get it along with the large tank up top.
I'm liking this project.
Cheers
Saturday, January 17, 2015
More mast
All my fabrication on the mast is complete and it is ready to haul to the boat yard. That being said, this simple dinghy lifting mast turned out to be quite a bit more work than I had figured, and I for those who know what I'm going to say next means, I used a large bottle of Argon for the welding. I would have never guessed a large Argon bottle would have been consumed, but it was.
Of course, having never done this type of project before didn't help with me getting finished in a reasonable amount of time, nor did my lack of putting a pencil to paper for some design work help much either. The mast step is already welded to the boat, and is comprised of two heavily gusseted pieces of 1/2" stainless plate welded into the heavily reinforced roof framing. The two plates have bores through them that the mast will pin in to allowing it to be easily laid down.
 The upper pin in the mast will bear the load, and the lower pin will be for locking it in place.
 In order for the mast to be able to pivot, I laid it out so that there is 1.5" of free space between the bottom of the mast and the step base. Once the mast is stepped and stayed, solid blocking will be wedged between the bottom of the mast and the step base.
 Because the bushings are going to be TIG welded in to the mast, I had to do a bit of compensating to allow for weld distortion. I decided to bore the bushings .006 over the pin diameter, and as luck would have it, that turned out to be the right amount. The fit is good with no tight spots and every so slight end play.
 When the pin engages both bushings, there is no side to side play. The lower pin used for locking the mast in place has no bushings welded in place.
The blocking should be 1.5" if I measured once and cut twice correctly.... or is it measure twice and cut once? Because the upper pin is going to bear the load, I decided to weld in heavy bushings to spread carry the load in the masts along with a more tolerant fit. Each bushing is two inches long, with 3/8" wall thickness ( the mast pin is 1.25" SS ).
In order to get the install alignment on the mast step perfect, I decided I'd have to weld bushings in the step when we install the mast. To build those bushings I used some two inch aquamet prop shaft from the scrap pile at Washington Marine. Gregg at Washington let me pick some scrap pieces for my pins and bushings, and it was much appreciated. Stainless steel is really nice material to work with on the lathe, and machines great.
Instead of butt welding the shroud and stay plates to the mast, I thought it better to use solid plates that ran through the mast. Eventually a steadying sail will be fit on the mast, along with a paravane rig, so I wanted the plate connection as stout as possible. The plates are 1/2" material, and because I don't really know the final configuration, I drilled what I thought was enough holes in each plate for possible future use. Drilling these holes 1.30" on center allows for shackles to fit next to each other.
A pad was framed at the top of the mast for the radar array along with a spreader bar that will hold work lights, a masthead/navigation light, weather center, and blocks for flags. The spreader bar is large enough antennas if we need. I bored a two inch hole above the spreader bar for wires to exit the mast and fasten to the spreader bar.
The 4" boom will have an electric winch on it for hoisting a load, and the mast will have another electric winch on it for lifting the boom. The plan is to hoist the load with the boom winch, then raise the boom with the mast winch to get the load over the rail and on to the roof. We'll control the side to sided with tag lines. The winches have remote controls, so that should make things a little easier to operate. I"m not 100% sure, but to power the winches, I'm going to have a battery on the roof with a small dedicated charger in the wheel house, or possibly a small solar panel to keep the winch battery fresh. Either way, the battery will be in a weather tight box along with the winch fuses and solenoids. All the winch brackets are in place along with test fitting the winches.


The cables used for the mast are 1/4" galvanized. All the shackles and turnbuckles are also galvanized. Because I'm always on a budget, I used hour glass type swage fittings to make up my cables. These types of fittings are not as nice as the single pass stainless swage fittings used on sailboat rigging, but they're for sure in my budget and look much better than cable clamps. I did use stainless steel on the thimbles since this point will see some abrasion. Years down the road when I start doing maintenance and repairs, I hope to upgrade to all stainless.

The next step will be to fit the mast to the step by welding in the step bushings with the mast in place. Once that's complete, we'll stand her up and be on the right side of having this job close to complete. I'm pretty pumped about having a way to hoist loads to the roof. This is going to be big time handy for getting bikes, kayaks, and of course our tender to the roof. I know I'll also be using this to hoist the welder for the handrail job along with hoisting the handrails. I hear of cruisers loosing tenders to theft because they have too much difficulty getting the gear out of the water and leave it out overnight. I"m hoping our rig is going to make our lives easier.
Cheers
Of course, having never done this type of project before didn't help with me getting finished in a reasonable amount of time, nor did my lack of putting a pencil to paper for some design work help much either.
The mast step is already welded to the boat, and is comprised of two heavily gusseted pieces of 1/2" stainless plate welded into the heavily reinforced roof framing. The two plates have bores through them that the mast will pin in to allowing it to be easily laid down. The upper pin in the mast will bear the load, and the lower pin will be for locking it in place. In order for the mast to be able to pivot, I laid it out so that there is 1.5" of free space between the bottom of the mast and the step base. Once the mast is stepped and stayed, solid blocking will be wedged between the bottom of the mast and the step base. Because the bushings are going to be TIG welded in to the mast, I had to do a bit of compensating to allow for weld distortion. I decided to bore the bushings .006 over the pin diameter, and as luck would have it, that turned out to be the right amount. The fit is good with no tight spots and every so slight end play. When the pin engages both bushings, there is no side to side play. The lower pin used for locking the mast in place has no bushings welded in place.The blocking should be 1.5" if I measured once and cut twice correctly.... or is it measure twice and cut once? Because the upper pin is going to bear the load, I decided to weld in heavy bushings to spread carry the load in the masts along with a more tolerant fit. Each bushing is two inches long, with 3/8" wall thickness ( the mast pin is 1.25" SS ).
In order to get the install alignment on the mast step perfect, I decided I'd have to weld bushings in the step when we install the mast. To build those bushings I used some two inch aquamet prop shaft from the scrap pile at Washington Marine. Gregg at Washington let me pick some scrap pieces for my pins and bushings, and it was much appreciated. Stainless steel is really nice material to work with on the lathe, and machines great.
Instead of butt welding the shroud and stay plates to the mast, I thought it better to use solid plates that ran through the mast. Eventually a steadying sail will be fit on the mast, along with a paravane rig, so I wanted the plate connection as stout as possible. The plates are 1/2" material, and because I don't really know the final configuration, I drilled what I thought was enough holes in each plate for possible future use. Drilling these holes 1.30" on center allows for shackles to fit next to each other.
A pad was framed at the top of the mast for the radar array along with a spreader bar that will hold work lights, a masthead/navigation light, weather center, and blocks for flags. The spreader bar is large enough antennas if we need. I bored a two inch hole above the spreader bar for wires to exit the mast and fasten to the spreader bar.
The 4" boom will have an electric winch on it for hoisting a load, and the mast will have another electric winch on it for lifting the boom. The plan is to hoist the load with the boom winch, then raise the boom with the mast winch to get the load over the rail and on to the roof. We'll control the side to sided with tag lines.
The winches have remote controls, so that should make things a little easier to operate. I"m not 100% sure, but to power the winches, I'm going to have a battery on the roof with a small dedicated charger in the wheel house, or possibly a small solar panel to keep the winch battery fresh. Either way, the battery will be in a weather tight box along with the winch fuses and solenoids. All the winch brackets are in place along with test fitting the winches. The cables used for the mast are 1/4" galvanized. All the shackles and turnbuckles are also galvanized. Because I'm always on a budget, I used hour glass type swage fittings to make up my cables.
These types of fittings are not as nice as the single pass stainless swage fittings used on sailboat rigging, but they're for sure in my budget and look much better than cable clamps. I did use stainless steel on the thimbles since this point will see some abrasion. Years down the road when I start doing maintenance and repairs, I hope to upgrade to all stainless. The next step will be to fit the mast to the step by welding in the step bushings with the mast in place. Once that's complete, we'll stand her up and be on the right side of having this job close to complete. I'm pretty pumped about having a way to hoist loads to the roof. This is going to be big time handy for getting bikes, kayaks, and of course our tender to the roof. I know I'll also be using this to hoist the welder for the handrail job along with hoisting the handrails. I hear of cruisers loosing tenders to theft because they have too much difficulty getting the gear out of the water and leave it out overnight. I"m hoping our rig is going to make our lives easier.
Cheers
Monday, December 29, 2014
Mast
The last two months have been occupied by getting work done on the house, and with a few house projects looking good, I found a bit of time to delve back into the boat. 
Having accumulated some parts for the mast over the last few months, I felt I owed it to myself to do some work fabricating the mast. The mast will be used for hoisting our tender to the roof along with any other heavy item we might want to lift. The radar dome and some other electronic gear will find a home in the mast. The mast will also support the future paravane rig along with a possible steady sail.

The mast is being fabricated out of six inch schedule 40 aluminum pipe with the boom being four inch schedule forty aluminum pipe. The six inch mast will be deck stepped with a fore stay and two shrouds on both port and starboard. Because their will be no back stay, two of the shrouds will be aft of 90 degrees to on both port and starboard, working with the fore stay to hold everything up. All the heavy framing and reinforcing was done on the super structure during the build.
The mast will be pinned to the step using two 1.25" stainless pins. The load bearing pin will support the mast with heavy bushings welded in to the mast while the locking pin will just lock through a bore in the mast. Because the mast will have the ability to quickly be laid down, clearance needs to be left under the mast between the mast and deck so it can pivot. While there won't be much of a compression load on the mast until a paravane rig is installed, I still plan on creating easily removed solid blocking under the mast to deal with future loading.
The first order of business was turning the bushings for the load bearing pin that will be used in the mast step. The pins are 1.25" SS, and like I said above, the bushing will be welded in to the mast. For bushing stock I found some heavy walled tube with an ID of 1.23" and a wall thickness of 3/8". Realizing the bore of the bushings are going to distort due to welding them in the mast, I found myself guessing at how far over I had to bore the bushings. Settling on .006 ( six thousandths ) over I have a feeling in my gut I'll have to re bore after the welding. The bushings are 1.5" long.
The next item to be fabricated is the joint that allows the mast to pivot up and down along with left to right. I think the proper name for this part is called a mast car. All the parts were made on my lathe including boring the 1.25" round bar to create the 3" long tube for the part. The leaf for the part was cut from 1/2" stainless plate and was TIG welded to the tube. Having bored the tube to a final dimension of .003 over ( the pin is 3/4") I was not surprised when the pin was not fitting well after I welded the part. Chucking the part back in the lathe to clean up the bore was expected and I ended up having to bore about .003 from the bore to get back the nice fit I had before the weld ( I'm sitting here wondering how I'm going to clean up the bore for the mast step bushings after that weld).

The hinge ears for the boom are fabricated from 1/2" aluminum plate. I notched the 4" boom to accept the 1/2" hinge ears using a circular saw and cleaned the notch up with rotary burrs and disc grinders. The bores for the hinge pin was drilled in my mill and reamed to a final diameter of 3/4". The hinge pin was turned to .001 under for an nice fit. Because I don't have a spool gun, all the welds are TIG, and required heavy clamping, and lots of tacking to keep alignment true due to the high heat TIG creates.
Once I can get back in to the boat yard ( their closed until the 5th) to measure the step, and how long the boom will be, I'll cut the boom to length and begin welding in the bushing for the mast step. Depending on how creative I get with the aft handrail on the roof deck, I can almost handle a 13' tender. 12' will be a better fit, and I'm pretty sure that's the size tender we want. That being said, the boom will be somewhere in the neighborhood of 14' long. The beam of the roof is about 15' 8", so that leaves me about 6' 2" of boom to unload a tender with a beam of 5'.
As of today, the plan to do all this hoisting is with two electric winches. One winch for the load, and another winch for the boom. 2000 lbs electric winches pull about 100 amps under full load. Instead of trying to run heavy cables to the winches, I'll probably build a battery box and locate it next to the mast step. We could have a small charger in the wheel house, and run leads from the wheel house to the winch battery to keep the charge.

So far this is a fun project and like all things boat build, much more work than I'd anticipated. I have to do some research on cable and cable connectors to source some more parts, but that shouldn't be to hateful. I can for sure say it's been nice getting to do some lathe work and TIG welding on nice clean metal.
Cheers
Having accumulated some parts for the mast over the last few months, I felt I owed it to myself to do some work fabricating the mast. The mast will be used for hoisting our tender to the roof along with any other heavy item we might want to lift. The radar dome and some other electronic gear will find a home in the mast. The mast will also support the future paravane rig along with a possible steady sail.
The mast is being fabricated out of six inch schedule 40 aluminum pipe with the boom being four inch schedule forty aluminum pipe. The six inch mast will be deck stepped with a fore stay and two shrouds on both port and starboard. Because their will be no back stay, two of the shrouds will be aft of 90 degrees to on both port and starboard, working with the fore stay to hold everything up. All the heavy framing and reinforcing was done on the super structure during the build.
The mast will be pinned to the step using two 1.25" stainless pins. The load bearing pin will support the mast with heavy bushings welded in to the mast while the locking pin will just lock through a bore in the mast. Because the mast will have the ability to quickly be laid down, clearance needs to be left under the mast between the mast and deck so it can pivot. While there won't be much of a compression load on the mast until a paravane rig is installed, I still plan on creating easily removed solid blocking under the mast to deal with future loading.
The first order of business was turning the bushings for the load bearing pin that will be used in the mast step. The pins are 1.25" SS, and like I said above, the bushing will be welded in to the mast. For bushing stock I found some heavy walled tube with an ID of 1.23" and a wall thickness of 3/8". Realizing the bore of the bushings are going to distort due to welding them in the mast, I found myself guessing at how far over I had to bore the bushings. Settling on .006 ( six thousandths ) over I have a feeling in my gut I'll have to re bore after the welding. The bushings are 1.5" long.
The next item to be fabricated is the joint that allows the mast to pivot up and down along with left to right. I think the proper name for this part is called a mast car. All the parts were made on my lathe including boring the 1.25" round bar to create the 3" long tube for the part.
The leaf for the part was cut from 1/2" stainless plate and was TIG welded to the tube. Having bored the tube to a final dimension of .003 over ( the pin is 3/4") I was not surprised when the pin was not fitting well after I welded the part. Chucking the part back in the lathe to clean up the bore was expected and I ended up having to bore about .003 from the bore to get back the nice fit I had before the weld ( I'm sitting here wondering how I'm going to clean up the bore for the mast step bushings after that weld). 
The hinge ears for the boom are fabricated from 1/2" aluminum plate. I notched the 4" boom to accept the 1/2" hinge ears using a circular saw and cleaned the notch up with rotary burrs and disc grinders. The bores for the hinge pin was drilled in my mill and reamed to a final diameter of 3/4". The hinge pin was turned to .001 under for an nice fit. Because I don't have a spool gun, all the welds are TIG, and required heavy clamping, and lots of tacking to keep alignment true due to the high heat TIG creates.
Once I can get back in to the boat yard ( their closed until the 5th) to measure the step, and how long the boom will be, I'll cut the boom to length and begin welding in the bushing for the mast step. Depending on how creative I get with the aft handrail on the roof deck, I can almost handle a 13' tender. 12' will be a better fit, and I'm pretty sure that's the size tender we want. That being said, the boom will be somewhere in the neighborhood of 14' long. The beam of the roof is about 15' 8", so that leaves me about 6' 2" of boom to unload a tender with a beam of 5'.
As of today, the plan to do all this hoisting is with two electric winches. One winch for the load, and another winch for the boom. 2000 lbs electric winches pull about 100 amps under full load. Instead of trying to run heavy cables to the winches, I'll probably build a battery box and locate it next to the mast step. We could have a small charger in the wheel house, and run leads from the wheel house to the winch battery to keep the charge.

So far this is a fun project and like all things boat build, much more work than I'd anticipated. I have to do some research on cable and cable connectors to source some more parts, but that shouldn't be to hateful. I can for sure say it's been nice getting to do some lathe work and TIG welding on nice clean metal.
Cheers
Saturday, November 29, 2014
Firewood
This post is really not boat building related unless one considers that I heat our shop with a wood boiler.
For years now, I've been splitting my wood the old fashioned way. I saw it, and the kids get paid to split it. In a typical year, we burn about five cords of wood. Because of the work I do, I usually get paid to haul it off someones site, so we usually have an ample supply of 12' long logs.
A friend of mine acquired this wood processor that operates from a skid steer loader, and offered to rent it to me for a weekend. This year, we purchased a new Kubota SV90 compact track loader, which was just the right sized machine to operate this heavy duty attachment. As you can see, this wood processor, picks the log up, saws it, then splits it through a six way wedge. After a small learning curve, I had the machine dialed in and in five hours of working it, I processed about six cords of wood. It should probably be mentioned that I didn't really break a sweat or strained by back.
We already have most of our wood for this year split and ready to go so this recent bit of work is for next season, or it will allow me to crank the heat up in the shop. Either way, I got a huge monkey off my back quickly and for next to nothing in cash laid out.
Cheers
For years now, I've been splitting my wood the old fashioned way. I saw it, and the kids get paid to split it. In a typical year, we burn about five cords of wood. Because of the work I do, I usually get paid to haul it off someones site, so we usually have an ample supply of 12' long logs.
A friend of mine acquired this wood processor that operates from a skid steer loader, and offered to rent it to me for a weekend. This year, we purchased a new Kubota SV90 compact track loader, which was just the right sized machine to operate this heavy duty attachment. As you can see, this wood processor, picks the log up, saws it, then splits it through a six way wedge. After a small learning curve, I had the machine dialed in and in five hours of working it, I processed about six cords of wood. It should probably be mentioned that I didn't really break a sweat or strained by back.
We already have most of our wood for this year split and ready to go so this recent bit of work is for next season, or it will allow me to crank the heat up in the shop. Either way, I got a huge monkey off my back quickly and for next to nothing in cash laid out.
Tuesday, November 4, 2014
Haul out
As I stepped out of the house early the other morning, I noted how quite the fall woodlands is vs the summer season. Gone are the summer song birds who's chatter fills the woods from the moment the night scape fades. The sound of the dormant season is of the nuthatch and chickadee with their husky calls. For some reason I think of and older lady bartender, withe her bar room baritone voice when I hear these birds.... the laugh of too many Marlboro's and cheap scotch whiskey. Why that bird call reminds me of this I can't say, but what I can say is that this subtle change in the surrounding woodlot keeps me well aware that the cold months are soon upon us and it's time to haul Gragodeo out for the first time.
I would have much preferred to keep her in the water over the winter. Having coffee in the wheel house on a winter morning, while looking out on a harbor scape sure did sound appealing, but my wanting to see how the below the water line hull fared during her first season was more important. I'm happy to say that the hull looked good, with no sings of electrolysis or failure of the barrier paint. The only below the water line issue I saw was where I did not get a good enough scuff on the barrier coat to give enough tooth for the anti foul to be able to bond. On advice from the boat yard paint guru, I'm going to spot sand the areas where the anti foul was blown off by the power washer and re coat those areas only.
 The prop is the other below the water line area that's going to get a hard look. As I posted some time ago, I'm getting a high pitched sound at certain RPM's . Between 1100 and 1650 the sound is most pronounced. There's really no reason for the stern tube bearing to be making this noise as the bearing was machined correctly, and the alignment is spot on. Now that she's on the hard, I looked closely at the bearing, and found no signs of wear or any play in the shaft/bearing. The prop was purchased from an on line dealer and is a Taiwanese or Chinese import. After searching out this harmonic issue I'm having, I'm starting to think I have a case of whats commonly called prop sing. Prop sing is where the edge of the prop is somewhat defective and causes a harmonic sound similar to one rubbing a finger around a fine wine glass ( only louder). The fix for this is to machine a 45 degree chamfer on either the trailing edge or the leading edge. This can be done in field or by a prop shop, and I think I'm going to have a prop shop look at this for me. I want a professional to measure the prop and tell me what I have in regard to quality beginning with the bore, and ending withe the blade tips. I went the cheap route when this prop was purchased so now is the time to see how expensive my cheapness actually is.
The cruise down to the haul out yard was done with my 17 year old daughter on a drop dead gorgeous fall day. I recorded a short video of our "three hour tour" so that when the winter blues has found me, I'll have this nice video reminder of a great day to cheer me up.
 There are some big projects that need to be done on the boat build this winter to get her to a more finished state, but they will have to be worked in with some renovations we'll be doing on the house. My goals for the boat build this winter are to install the mast and boom so we can carry a dinghy on the roof. Complete the hydraulic system so I don't have to hoist the anchor by hand next year and also have the bow thruster operational. The air conditioners are on board, but have not been hooked up, so that's a biggie on the lists. While I'm up on the lid working on the mast, I also want to fabricate the hand rails for the salon lid.
The next weekend will be spent winterizing her, and after that a few projects around the house need to get finished. We have plans to take a few extended cruises next season, and getting my list checked off is going to be tight given that my launch date is only seven months away. Sound familiar?
Cheers
I would have much preferred to keep her in the water over the winter. Having coffee in the wheel house on a winter morning, while looking out on a harbor scape sure did sound appealing, but my wanting to see how the below the water line hull fared during her first season was more important. I'm happy to say that the hull looked good, with no sings of electrolysis or failure of the barrier paint. The only below the water line issue I saw was where I did not get a good enough scuff on the barrier coat to give enough tooth for the anti foul to be able to bond. On advice from the boat yard paint guru, I'm going to spot sand the areas where the anti foul was blown off by the power washer and re coat those areas only.
The prop is the other below the water line area that's going to get a hard look. As I posted some time ago, I'm getting a high pitched sound at certain RPM's . Between 1100 and 1650 the sound is most pronounced. There's really no reason for the stern tube bearing to be making this noise as the bearing was machined correctly, and the alignment is spot on. Now that she's on the hard, I looked closely at the bearing, and found no signs of wear or any play in the shaft/bearing. The prop was purchased from an on line dealer and is a Taiwanese or Chinese import. After searching out this harmonic issue I'm having, I'm starting to think I have a case of whats commonly called prop sing. Prop sing is where the edge of the prop is somewhat defective and causes a harmonic sound similar to one rubbing a finger around a fine wine glass ( only louder). The fix for this is to machine a 45 degree chamfer on either the trailing edge or the leading edge. This can be done in field or by a prop shop, and I think I'm going to have a prop shop look at this for me. I want a professional to measure the prop and tell me what I have in regard to quality beginning with the bore, and ending withe the blade tips. I went the cheap route when this prop was purchased so now is the time to see how expensive my cheapness actually is.The cruise down to the haul out yard was done with my 17 year old daughter on a drop dead gorgeous fall day. I recorded a short video of our "three hour tour" so that when the winter blues has found me, I'll have this nice video reminder of a great day to cheer me up.
There are some big projects that need to be done on the boat build this winter to get her to a more finished state, but they will have to be worked in with some renovations we'll be doing on the house. My goals for the boat build this winter are to install the mast and boom so we can carry a dinghy on the roof. Complete the hydraulic system so I don't have to hoist the anchor by hand next year and also have the bow thruster operational. The air conditioners are on board, but have not been hooked up, so that's a biggie on the lists. While I'm up on the lid working on the mast, I also want to fabricate the hand rails for the salon lid. The next weekend will be spent winterizing her, and after that a few projects around the house need to get finished. We have plans to take a few extended cruises next season, and getting my list checked off is going to be tight given that my launch date is only seven months away. Sound familiar?
Cheers
Subscribe to:
Posts (Atom)