Sunday, July 29, 2012

Super structure

Now that the salon is fabricated and welded to the wheel house, I will officially call this the super structure.

The wheel house was fun to build because it has such cool design elements and it's the wheel house. The salon was fun to build because building these structures goes so quickly that you really feel like you're getting something done. Now that I've been welding on the super structure for the last week, I'm ready for this part of the build to be finished. I can tell you that 90 % of the welding is finished, and if I didn't run out of welding wire this morning, the job of heavy welding would have been almost complete. I say almost complete because once I'm finished with the heavy welding I still have a few small jobs to complete including: all the window stiffeners and nailing cleats need to be installed, the doubler plates for the hand rail and dingy cradle, the vents for the composting toilets, the mast step, mast framing, and mast rigging pad eyes. I also need to weld  future brackets for paravanes, and bushings for the ladder that will be used to gain access to the roof. 
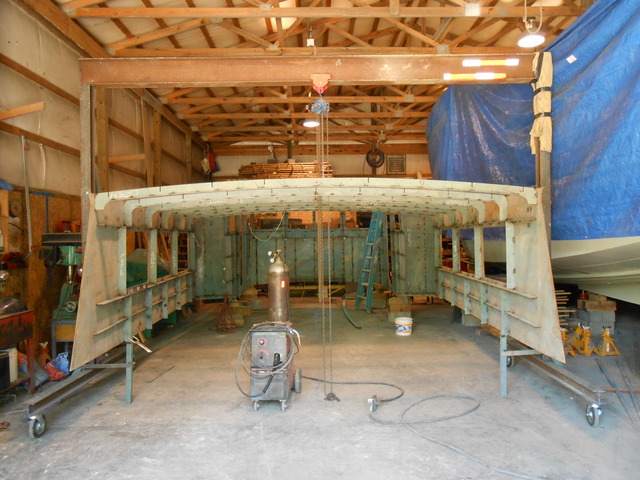
This is still a fair amount of work, but the hours and hours of heavy over head welding are behind me and whats left is not really that much. to do.


The salon measures about 14 x 14. The original design had it measuring 14W x 16L. I wanted more space for a larger cockpit so I increased the size of the cockpit by 2' which shortened the salon by 2'. Was this worth it? I think so. For me, lounging in a chair under the cover of the cockpit roof will be a great place to hang out. I also think I can now have a hot/cold shower in the port side corner of the cockpit by using a  curtain on tracks. The extra shower will be a  huge asset. There is now enough room for a small table and four chairs along with a moderate sized grill. This is a wide body design, so there is no side deck to get from the aft deck to the fore deck. Because of this the salon bumps out from the wheel  house by about 24" on either side. The deck from the wheel house terminates in the forward salon wall. Using the step up to the wheel house, I'll  gain access to the salon roof via a ladder that will be mounted on the wheel house deck ( more on this later).

To build the salon, I had to jack up the wheel house to get things in the relative position on how the boat decks step up as you move forward ( raised pilot house design). The wheel house is now pretty high above the barn floor, so I'm going to have to install a temporary floor to paint along with scaffolding on the exterior of the wheel house.

The door in the salon is off centered to port because the salon table/settee goes on the port side. That port side corner will be nothing but table, so by having the door favor that side, we have more room on the starboard side for other things.  

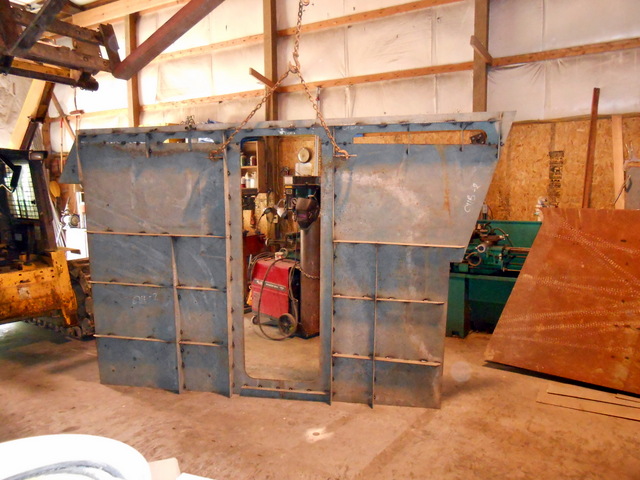
To increase the size of the cockpit I had to alter the bulkhead where the salon door and windows is. Because this wall move forward, I needed to install a 1" filler piece on either side of the bulkhead. This was a fairly small change that has required a little bit of noggin work. The real challenge with moving this wall and the small design change I made to the cockpit was the starboard boarding door I added. Adding the boarding door now requires me to cut the starboard salon side panel in such a way as to not offend the very cool line the designer had originally drawn. I need to put some good though in to cutting this panel to make panel look as if it was not some aborted afterthought.

The other change I'm going to make to the salon aft wall is I'm going to increase the size of the door going in to the salon. Right now, the door width is 25 1/2". I'm going to increase that door size to 32". 32" is not a huge door, but it does feel much better walking through vs the 25" door. The larger door will also make getting the stove and fridge through the opening much more doable. I'm still debating on making the door a 36" but that seems large. Since I"m building the doors myself I should probably go larger. I open to suggestions.

The salon roof over hangs the salon wall by 5". The design has a piece of trim that forms a soffit similar to a gutter board on a house. The ceiling I'm going to install for the cockpit roof will tie in to this soffit on the same plane and make for a nice, neat looking finish. The ceiling will have about 4" of clearance so I"ll be able to install some LED cans for some nice lighting.From a construction point of view regarding the clearance allowed for ceiling material, I wish that the designer had allowed a little more reveal so that using 3/8 ceiling material would still allow 1/2" of the metal trim piece to be seen. Right now, using 3/8 material will allow less that a 1/4" of  reveal, and in my opinion, that's cutting it too close. The last thing I want to see for aesthetics and maintenance, is the ceiling material below the metal trim. I also don't want to use 1/4" ceiling material, but I will it means seeing the ceiling below the trim.   Some of the push boats that work up and down the Ohio river have taken to running some accent lighting as they move at night. I think I'm going to install three LED cans in the soffit centered above the salon windows for accent lighting. A lot of the push boats use a blue light that I think would look sharp as long as it's not to bright.

The salon has 8 windows and all of those are sliders with screens. I went with a dark tint on these windows as I feel the tint helps with the heat.The windows are about 37 x 23... not hatefull huge, but a nice size. Before I paint, I'm going to test fit .

I"m a little behind on my schedule as I was wanting to be starting prep work for paint this week. Being realistic, I won't be fully into paint prep work for another week and a half. I still think I'll be finished with painting the super structure by the end of August but it's going to be tough. My plasma cutter went down on me today and that's going to slow me down. When you operate on a shoe string as I tend to, small problems can cause delays. I guess the positive aspect of operating on a shoe string is that when small problems pop up, I'm flexible and easily able to switch modes.

All in all the super structure has been fun to build, but like I said above, I'm ready to be done with it. Another week or so, and I"ll be full blown into paint prep and that will be a good thing. I'm sure, as I'm now singing the welding blues, I'll be singing the paint prep blues in a few weeks. As you might be able to tell from some of the pictures, the shop is about as full as it can get. There's still room to work, but it is very tight. I'll be able to take the gantry down once the funnel is in place, and that will help with room. I not so sure I'm going to know how to act once the good ship Conall leaves the barn with all the room I'm going to inherit.

Wednesday, July 18, 2012

The wheel house

The wheel house has now become my new favorite place on the boat..Before I built the wheel house, my favorite place was a toss up between the engine room and my cabin. I've never owned a boat with a wheel house, but I can without a doubt say that the wheel house is huge. The other thing I can say about the wheel house is that, the designer got it right when the designed the reverse rake of the forward windows and the trim ( the bill that extends from the roof) for the wheel house roof... it's perfect. I've seen some pictures of other boats of my flavor completed by others, and a few of those the builders decided not to install the trim as designed. I have always felt that it took much away from the look of the wheel house, and not that I've seen it up close and personal, I now know it to be a fact that eliminating the trim detracts from the look of the boat.

The first step in getting serious about building the super structure was to build a gantry. The left over 4" beams from the building cradle strong back provided most of the steel to do the job. The main lifting beam I had saved from the gantry I used to build the hull. Because things are getting tight in the shop and the gantry just fits between the metal lathe and the hull, I had to pad the gantry with a canvas tarp to prevent it from gouging the hull and causing me some serious paint repair. I"m so glad I decided to do this as the gantry has already bumped the hull. I can say that the rub rail is working.

Having previously assembled the side walls to both the wheel house and salon, the wheel house went together pretty quickly. The first thing I did was establish a center line on the barn floor, then squared another line off of that. The squared off line became the line for the wheel house front. Positioning the various panels in relation to the line and bracing them was about all it took to get the show started. Once all the panels were in place, I then installed the roof beams and the  room longitudinal stringers. The roof sheathing, obviously was the last item to be installed. Because of having all the layout lines laser etched into the sheathing, it was just a matter of putting the blue line on the roof sheathing on top of the  side wall and tacking the sheathing down. The roof sheathing is what squares up the structure, so paying attention to detail for this part of the build was a key strategy. I first tacked the sheathing in the forward corner then worked my way down one side bringing the side wall to the layout line and tacking the pieces together. Because the roof sheathing is now tacked to the side wall on the layout line, I then started to bring the  forward part of the wheel house to the layout line of the roof sheathing and tacked it in place. I started this process from the same corner. A lesson one learns quickly with metal work is never tack yourself in to a corner...always start from the closed end of something and work your way outbound. The other strategy with metal work is to tack all your parts together first, and leave the serious welding until  EVERYTHING IS TACKED TOGETHER.  Welding generates serious heat and caused the metal to move quite a bit. Final welding before you're finished fitting will only cause one grief. Now that I had two  panels tacked to the line, the third panel easily moved to the line and was tacked. I then installed the aft part of the wheel house and the box was complete.

This part of building the wheel house went together rather quickly and only took me about a day of work to get it finished. The trim for the roof section was another story. The trim wraps around the wheel house and creates a drip edge to keep water from running down the sides of the wheel house. The forward piece of the trim extends down over the room sheathing a little further than the side trim, and  creates a bill to keep the sun out of the captains eyes. It's the exact same as wearing a hat, and not that I see it installed, I love it. The other piece that gets installed to complete the trim is a piece that angles up from the room at 45 degrees, and welds to the bill. This 45 degree piece creates a gutter on the inside of the roof and also stiffens the bill piece of the trim. The gutter piece is another nice detail that will make painting and maintaining this part of the boat easier. There are no tight crevices for bad things to start working against me and everything is open and easily reached. This same gutter detail will be repeated on the salon roof, and all the rain will  travel this course and discharge overboard without hitting the decks. There will be a lot of rain running this path, so I need to have a way to capture it and get it in to the water tanks if the need arises. All the trim parts when installed ended up having funky angles with compound bends. The funky angles and compound bends required some patience, and about as much time to do as assembling the main wheel house panels, but in the end it was worth it. All of the trim is fair and  should paint up nicely.

I"m ready to start on the salon, and once that's in place, I'll final weld all the seams for the super structure. Because the deck of the boat falls from bow to stern, the back of the wheel house is sitting on the barn floor with the front up on some blocks. Before I can assemble the salon, I have to jack up the wheel house the same distance as the step that is decks. I could leave it as it is, but that would mean being crouched over as I build the salon, and that won't work for me. I'll probably end up putting in a temporary floor in the wheel house to make painting the inside easier.


This picture shows a little more detail on how the gutter is formed and how the designer projected the trim to hang over the wheel house walls and create a drip edge to keep water off the wall. I like the way this was cut, and I love how fair and subtle the curve of the wheelhouse wall is. I actually think I found my first error in the cutting file. The trim you see to the right is about four inches short of where it needs to finish. I'm not going to do anything until I have the salon welded to the wheel house. If this is a cut file error, it won't be that big a deal to fix by extending these two pieces another four inches.


 In case anyone is curious, I now have a tarp hanging off of the hull to prevent any damage to the paint from grinding and other things I'm doing while building the super structure.

Cheers


Thursday, July 12, 2012

Ships log

Boat position: N38* 57' 46.03"  W84* 14' 45.13"

Nautical miles traveled: .0006583

Engine hours: 0

Captains state of mind: Hmm?

What's this all about you ask? The reason there is a small percentage of nautical miles traveled is because the boat moved. The reason the boat moved is because it's sitting on the axles that will move her to THE LAUNCH SITE. The reason I moved the boat is because I could.

The move of the boat represented about two feet forward, then two feet back. It was a pretty easy thing to with a little nudge from my skid loader providing the power.

Getting the boat on the axles was a pretty straight forward job that consumed some hours. The first thing I did was reinforce the bow section of the building cradle. Since the aft section of the boat was getting lifted the highest, I decided to jack up this end first, and then do the bow. I was afraid the lifting cradle on the bow would not handle the shifting, forward push of the load, so I added some bracing to the cradle. The next step was to build cribbing using concrete blocks on the port and starboard side of the boat to catch it if something bad happened. I knew it would not twist off of the jack since it was supported by the bow cradle, but if the bow cradle failed, and it dropped down on to the cribbing I had under the bow, it could roll off of the jack, hence the cribbing on the sides.  I used a 30 ton bottle jack under the keel and a frame member to jack the boat up. I also placed cribbing along side the jack in case the jack failed.

The boat  went up off of the jack stands smoothly, and without any hiccups.  I was pretty pumped to see it separate from the building cradle, and slow was the speed I chose to operate at. I would lift if a couple inches, then stop and take a walk around to see how it was behaving on the bow building cradle. Once it was high enough, I would add some wood blocks to the temporary side cribbing to keep the distance to the hull close, then lift it some more. I guess it took about an hour and a half to lift it the 14" I needed to get the axle under the keel. Most of the time was me checking things out and going outside the barn to chain saw more wood blocking as she got higher.

Being able to jack this boat up from one point gives some testament to how stout she's built.  

I had the axle under the boat before I started to lift her, so once she was high enough, I rolled the axle to the final position the squared the axle to the hull. Since I still had the cradle strong back in place, and since the hull was built square to the strong back, I just measured off of the strong back and positioned the axle off of that. Because the rear axle is so wide, the cradle strong back prevented me from  putting two of the four wheels on the axle while the strong back was in place. Once the axle was in position, I torch cut some of the strong back away, and put the two outer wheels on the axles. With all four wheels on the axle, I lowered the hull on to axle. I was amazed at how much the axle started to deflect, but due to me reinforcing the tube, the deflection was minimal. Once the load was fully on the axle, I lightened the load a bit and fabricated the stanchions that will prevent the boat from tipping off the axle. To pad the hull from the stanchions, I cut up pieces of rubber mud flaps and put them between the hull and the stanchion pads. Once the stanchions were in place, I lowered the hull on the axle and moved my operation forward.

Placing the hull down on the forward axle was much easier and went pretty quick. I just had to jack the hull off of the forward cradle, cut the cradle and strong back away, then roll the steering axle in place. I took a few measurements, and made sure the steering axle was parallel to the rear axle, placed some two inch blocks on the I beam cross members I had made for the steering axle, and lowered the hull on to the steering axle. The only hiccup I had doing this was when I was putting the hull on blocks so I could move the jack, two of the concrete blocks broke, and I had to replace them. The loud popping of the block made me jump a bit, but it worked out OK. As I placed the full load of the hull on to the steering axle, I quickly realized the tires are not beefy enough. If I tried to haul the boat with those tires and as much as the tires have bulged, the tires would quickly heat up and blow out. A blow out would be sure to happen even at the slow speed I'm going to be traveling at. I kept more of the load on the keel blocks, and a call to my tire guy assured me I could replace the 10 ply tire with some larger 24 ply tires that would make the trip. I'll deal with replacing the tires in a week or so.

The hull is now about 18" out of level so very little work will be done up there until she gets to THE LAUNCH SITE. There are a few little jobs I need to get finished before I haul her out of her nice cozy barn, but my main focus will be  getting the super structure ready to install. Now that she's on the axles, I measured her down the road height at 14' 5". This height is lower than I had originally thought it would be, and that's a good thing as wires should be of little issue. I will clear the highway overpass by more than a foot and a half, so for right now all is good.

Now that the hull is on the axles, and I have the cradle removed from the shop, I am moving on with getting the super structure put together. The panels are already built, and now that I have the cradle steel available to me, I'll put together a gantry and get on with some more building. The building part of this type of project is fun, with all the devil in the details. I'm not going to make any promises, but this next part of the build should go pretty fast.

Cheers,


Monday, July 2, 2012

Work has started on the super structure

The axle work continues, just not by me. Due to me being busy with work and not wanting to mess with re building the dually axle I procured, I happily delivered it to JCM Equipment so they could put bearings in the axle. This axle has turned in to a loosing deal, but I'm too far in to it to call it quits at this point. The easiest way to explain the dual wheeled axle I got for free is that this has been  the most expensive "free"  I've ever found. I should probably end this thought with a Gumpism and say that "this is all I have to say about this right  now"

So, while I wait for the axle to  be picked up from JCM, I started work on the wheel house and salon, which I will now call the super structure. All the parts for the super structure were scattered around the barn years ago, and it took me half a Saturday to round them up and inventory everything I actually  had some of the long frame pieces stashed away in the roof truss's. I found everything, and checking my stash against the working drawings, every piece is accounted for.

After inventorying all the parts, the first order of business was to drill all the frames for the bolts that would be used to fasten the framing timber with. One of the mistakes I made on building the hull was to not drill all t he frames before I erected them. Drilling on the drill press will save me hours of work. Using 1/4" bolt is what I plan on doing, so I drilled all the holes to 5/16. The overage gives me plenty of room for paint and will help prevent skinning up the hole when I drill for the timber. After I drilled all the holes, I used a counter sink to ease the edge and give me a more paint friendly hole.

When you break the super structure down in to it's most simple form, it's basically a box. Four sides with a roof. Because of having to build the boat in two pieces, it also made the most sense to build the super structure as panels. Assembling the panels went very quick. Because all the parts were cut on a CNC machine, the accuracy of the parts is amazing. The really nice thing about having the metal cut via CNC is that the designer also had all the layout lines burned in to the metal. My appreciation to Bruce Roberts and Hal Whitacre on their attention to detail. A nice surprise I discovered while assembling these four panels is that the designer gave each panel a slight outbound crown. The crown is slight enough, about an inch over the length of the 16' salon panel  you see hanging from my skid steer loader, but not so severe as to interfere with the window installation. I don't know the reason for giving these panels a slight crown, but my guess is that the crown puts some tension on the metal and will help it to fair up much nicer.

The salon skin showed up at the shop with the window openings already cut out. The wheel house has the window rough openings burned in to the metal, and only the door openings are cut out. I'm going to wait until I have the panel welded in place before I cut out the windows.  I already have the windows on site, I just want to wait  until the panel is in place as this will be help keep the panel shape as per design.

You can see on this picture below how the wheel house sheathing arrived at my place. The precision of the CNC plasma cutting is amazing. As you can see from this picture, the wheel house side is in three pieces. All I have to do is grind a bevel in the outside joints that will be ground flush. Turn the pieces over, kick them together so they line up, and tack them. The next step is to put the longitudinal stringers on the layout lines that were laser burned in to the metal and tack them in place. Making sure the sheathing is tight to the longitudinal stringers assures the panel will take the shape the of the design. Once all the longs are tacked in place the frames are fit over  the longs and tacked in place. The frames have all the notches cut in them including the mouse holes so no water can get trapped and start a crevice corrosion situation. The longitudinal stringers were also cut by the CNC machine so the designed shape is formed by the longs.  On this size project, with all the framing I had to do, I have yet had an situation where no part fit any less than perfect. 

All the panels are assembled and stacked against the barn wall while I begin taking the boat off of the building cradle and sitting her on the axles. JCM has told me the axle will be ready for me to pick up mid to week. I have to make a trip to the steel yard and pick up some square tube to build stanchions for helping support the boat on the axles. I hope to have her sitting on the axles after this coming weekend.

I'm feeling pretty good about finally being able to assemble the super structure. It's a big piece of structure, but I feel as if it will go together quickly and without any major hiccups. I am pretty sure I have a plan that will allow me to do some good layout and build the super structure so that it will mate with the hull in a good way.

Cheers


Cheers