Sunday, February 5, 2012

Paint issue resolved


The biggest issue my last post dealt with was the paint catastrophe I had going on. I'm glad to report that I've figured out the problem, and I can move forward with getting items checked off of the list.

The paint problem I was having is resolved, and I'm happy to report that it was all operator error. The problem I was having with my white paint was that the paint was not atomizing correctly. In a nut shell, the paint particles were too large when they were sprayed on to the metal giving the finish a texture. The problems I was having were a direct result of the following: I was using the wrong reducer. I should have been using MEK, and I was using lacquer thinner. The MEK evaporates more quickly than the lacquer thinner so I can build the film more evenly. My air hose to my paint pot had too small of an ID, so I increased the hose form 1/4" to 1/2" . The friction loss of air in the smaller ID hose caused me to loose volume and pressure in the pot and effected atomization. The hose ID had never been an issue with all the other paints I've applied, but this particular species of white was just a little different animal. The shop temperature was just a little too cold, and required more attention to how I was reducing the paint, and what I was reducing with.

So, I'm going with a dark green on the hull, and an off white on the super structure and decks. The green looks darker in these pictures, and the white looks whiter in these pictures.

Like I said in my last post, this paint is shiny, very tough, and is able to be polished and buffed if I ever have to make repairs on it.

Now that the paint issue is no longer an issue I can move forward. I want to finish the fore deck and get that final painted. To finish the fore deck I need to mount the deck winch and fabricate the dorade box's for the guest/kids cabin. Mounting the deck winch is more of a project than I had figured since I might have to re configure the anchor rollers. I'll have more on that job later as I get some things figured out.

In case no one has noticed, I added a music player to my hipster blog gadgets. A fellow builder I'm friends with has a blog where you can check out his fine work @

http://www.odysseyyachts.com/Odyssey_Yachts/Odyssey.html

The song, "Home At Last" on this playlist, is a more modern interpretation of Brian's boats name, but you'll have to visit his blog to know what I mean. I"m now looking for a song geared towards Hawaiian ducks that are prone to wandering for another builder I follow.

Of course a song for Shannon is on board for all to guess, and one she is sure of.

Turn up the volume on your computer to follow along.

Tuesday, January 24, 2012

Bulwark doors


Both the fore deck of my trawler and the aft deck are surrounded by a 36" tall bulwark, and to get on board the boat, and move from the pilot house to the fore deck, I had to create doors to pass through the bulwark.

If you look up the definition of bulwark you will find phrase's such as a wall like structure raised for the purpose of defense. Basically, the bulwark is a solid steel fence surrounding the boat. Most boats use a handrail type system of stanchions and rails ( either pipe or wire for the rails). I like the solid bulwark, and although heavy, it adds a huge level of security to life on deck. On the fore deck, I added a 1 1/2" stainless steel pipe handrail to the top of the bulwark, giving me a finished height of about 44"... pretty comfortable height. I've yet to add a hand rail to the aft deck as I am worried about interfering with the view as the aft deck will be the sun downer lounge.

The aft deck has two doors to use to gain access to the boat depending on how she is moored. The choice to get on board will either be by using the swim platform, and up the three steps to the deck, or using steps on the dock, the through the bulwark on the starboard side.

The wheel house is protected from the fore deck by another type of bulwark called a Portuguese Bridge. This is basically the same as the deck bulwarks, but much taller @ 46". The Portuguese Bridge will allow one to leave the wheel house while at sea with a greater sense of security. The Portuguese bridge also adds a huge level of protection to the wheel house in rougher times when green water might be getting to the fore deck. To get from the wheel house to the fore deck, you have to pass through the third door I had to fabricate.

The bulwarks and the Portuguese bridge are one of the architectural details to this boat that makes the boat more blue water capable.

The doors are hinged by a simple 1/2" stainless steel pins that have the door sliding over the pin. To make the hinges, I welded heavy walled tube to a tab, then fit the 1/2" pin to the tube. To avoid having to turn the pins, and bore the tubes, I used material with the same outside diameter and inside diameter. Since the pins and tubes are the same ID and OD, I knurled the pin at the pin/tube interface to create an interference fit between the pin and the tube. I removed a few thousandths of the pin on the door side while I had them in the lathe for a smooth action of the door on the hinge. The pins can be removed with a punch and hammer. While I was in the hinge making mode, I decide to make and extra set of pins for all the doors and add them to the spare parts inventory for the boat.

I wanted a simple, robust way to latch the doors closed, so I decided to fabricate a dogs for the doors. To make the door dog, I used 3/4" stainless rod, and rounded over the ends on the lathe using a round over bit. I then bored a 1/2" hole through the handle. On the door side of the dog, I used some 5/8" stainless round stock, and turned about an 1 1/4" of the stock down to 1/2". I then used the lathe to cut threads on the now 1/2" piece to fit 13 TPI nuts. I'm using nyloc nuts so that the action of the handle will not loosen the nut as the handle is turned. All the doors will land against a wooden jamb that I will bolt the the bulwark frame, then the door dog will be turned against a stainless steel wear plate screwed to the wooden jamb to lock the doors down fast. I might add a gasket between the door and the jamb to help help with keeping paint on the door edge.

The doors are painted the green color of the hull on the outside and the off white color of the bulwark on the inside. The green paint went on the doors great, but I had some problems with the white paint. For some reason the white did not want to atomize, and I found myself with my first paint problem. I tried some reducer in the paint, but that make the paint to thin, and it would not stay vertical so I got some sags. My paint supplier is helping me work this problem out, and once I get a handle on the problem, I'll finish painting the doors and post some installed pictures.

I've tried to repaint the white on the doors by tweaking a few things with not much luck. One thing I have discovered is that the acrylic urethane paint I'm using is extremely tough. Because I'm unhappy with the finish of the white, I've had to sand the poor finish back down to provide a smooth substrate for the next coat of paint. This is the first time I've ever had to sand this paint, and given what I've experienced, I can promise all of you who are reading is that this paint will have excellent abrasion and toughness, and will give me years and years of service.

Friday, December 30, 2011

Port lights

I have seven port lights on the boat and all of them are fixed, non opening lights. The reason I decided to use fixed lights were for two reasons. Reason number one was the designer of the boat was not to keen on opening lights given how close to the water line the port lights would be ( about 3' amid ship, 4.5' on the forward light), and the other reason was for cost savings. The cost savings are a result of me fabricating the port lights and not buying commercially made lights. Including the 1/2" tempered glass, gasket material, and screws, I have less than $250.00 in building all seven port lights. This small amount of money is encouraging, but hopefully is not something that will bite me in the ass years down the road once we start using the boat.

My primary concern with fixed port lights is of me having cut off ventilation to the cabin area of the boat. Because the port lights are fixed, I had to pay closer attention to how I was going to keep the air fresh and flowing in to the cabins. The kids cabin has a 20" x 20" ocean hatch along with two 5" dorade style vents. The hatch will be open when possible, and the dorade style vents will be operable more often that not. The thing I like about the dorade/cowl style vent is that we can leave them open while we are not on the boat so fresh air continues to circulate. The kids cabin also has 12 volt fans. The master cabin has two 6" dorade/cowl style vents and two 4" dorade/cowl style vents. The master cabin also has 12 volt fans. The lower cabin area has a dedicated, marine style, 12,000 btu air conditioning unit.

I recessed the port lights in to the hull 5 1/2" which made the lights flush with the interior trim. I really like the the way the recessed light looks on the exterior hull, and I also like the flush look of the interior trim of the light. The recess of the port light was fabricated using all stainless steel. Given that I was going to bolt the glass to the hull using a clamp ring, and how difficult it was going to be to not mar the metal flange, stainless was the only material I could use to insure that no rust stains would originate from the port light. With the flange of the port light so close to the interior trim, having the metal sweat was another big concern for me. I painted the flange with insulating paint, and also installed a closed cell gasket on the interior face of the flange. The wood trim rings then covers the gasket and flange, so all you see is glass and wood.

To give the exterior recess a more refined look, I flared the recess out 7 degrees. The 7 degree flare made fabricating the recess spigot a bit of a challenge, but once I figured out the cuts, the job was fairly simple. The port light recess spigot consists of five parts: the flange, the two end piece's and the two center piece's. The two end piece's are what make the 7 degree flare, and in order to help the weld up go easier, I bent the end piece's on a jig I built to work on my log splitter. I also built a jig for welding the spigots so all the spigots would be identical. All of this work happened a few years ago, so all of the above post is a re cap.

The current job regarding the port lights was getting the glass installed. All through the port light building process, I had made and save templates of the various parts. Having the templates in the shop has saved me the time and hassle of having to re figure everything and allows me to easily fabricate parts like the 14 additional gaskets I had to cut to get the glass installed.

Each piece of 1/2" tempered glass is held in place by a stainless steel clamp ring. After I fabricated the clamp rings, I sand blasted them to help the paint stick to the rings. The ring is bolted to the spigot flange using (14) 1/4" stainless machine screws and nyloc nuts. There is an 1/8" closed cell foam gasket glued to the flange using contact cement, the glass, and then the stainless clamp ring with another 1/8" closed cell foam gasket glued to the clamp ring. So, basically, if you can envision a glass sandwich of gasket flange, glass, and gasket clamp ring, you can sort of see my design. I did not bolt any of the port lights to any of the interior timber framing, rather all the lights are bolted to the flange only. In my eyes, this was critical to not allow any wood movement to cause nuts and bolts to loosen. In the bathroom, I did use four longer bolts to bolt the trim ring to the port light flange as there was no other way to fasten the wooden trim ring.

Installing the glass was a two person job. One person on the outside dealing with the parts install, and one on the inside holding the nyloc nuts so the screws could be torqued. Even though I used a jig to weld the spigots together, the flange is not perfectly flat. The lack of flatness is not hatefull, maybe .080 across the length of the 19" flange, but it's possible presence gave me enough concern to be careful in how much torque I used while tightening the screws. I torqued the screws enough to start compressing the gaskets, and no more. The nylon nuts will prevent the screws from loosening up. While the flatness of the flange is really not an issue, I did not want to get all gorilla on the screws and risk cracking the glass. Because of the outward camber of the glass, I applied a little bit of contact cement to the glass and the flange gasket prior to installing the glass. I then pressed the glass to the gasket to hold it in place while I positioned the clamp ring and pushed the screws through. The gap between the clamp ring and the spigots sides is a respectable 1/8" - 3/16", which I will calk later, once I figure out what kind of caulk I'm going to use. A clear caulk would probably work, but I'm going to look in to tinting some caulk the same color as my paint. I haven't decided if I will caulk the glass to clamp ring joint yet. I feel very good that these lights will not leak and will be robust enough for off shore use. To test the quality of the seal we made, I had my son inside the boat and I used the shop air compressor to blast air at the port light from outside the boat. Using a smoking match, we could see no signs of air getting past the seal we made.

Because of how the lights are framed, I decided to paint the spigots before installing the glass. I gave each spigot a good scuffing, and repaired some dings I made from carelessly throwing debris out of the port light opening. I'm using PPG's industrial line of paints on the boat and have decided to use an acrylic urethane. The urethane is a high gloss with good toughness ratings and abrasion resistance. The thing I like about this paint is the ability to be able to get back in to the paint for repairs. I really would have preferred to have the whole hull painted, but I'm not ready for that stage yet, and won't be until late spring or early summer. Seeing the first bit of shiny paint on the boat was a big time boost to my morale, and has really got me motivated to get to the stage of being able to top coat the whole hull. Because I painted the spigots before the hull, I have a parting line to deal with around each port light. For painting,I taped the light off 1" away from the spigot. When I paint the hull, I'll wet sand the parting line I just created flush with the primer, then tape back towards the spigot 3/8" or so. I'll then have to wet sand that now new parting line flush with the top coat I just applied and buff. I'll have more parting lines to deal with due to the way I intend to paint the hull. If I can get another person to help with the spraying, I might get away with no parting lines other than the port lights.

All the port light glass is now installed, so I can now permanently install the wood interior trim rings and give them a coat of urethane. Now that the glass is installed, the difference in sound is amazing. I can no longer hear the radio that plays in the shop, and my son and I had to almost shout to communicate with him on the inside of the boat, and me on the outside. I'm happy with the way the port light project turned out, and I'm very happy to have another big job checked off of my list.

Friday, December 16, 2011

Bilge pumps


To date, I have three bilge pumps on board. Basically, one bilge pump for each of my three water tight compartments. One pump in the cabin area, one pump in the engine room, and one pump in the lazarette. The pumps in the engine room and cabin area are 1 1/2" discharge, 3700 GPH Rule pumps with Water Witch sensors for the switch. The pump in the lazarette is a 1 1/8" discharge, Rule 1500 GPH. I have also made provisions in my hydraulic circuit to have on board a hydraulic pump rated @ 11,000 GPH. The hydraulic pump will be plumbed in to the engine room and forward cabin compartments, and I will direct which compartment it is to pump out via a valve and manifold. The 11,000 GPH hydraulic pump is a two inch discharge. The pumps all have an automatic float switch along with a manual switch. The pumps will have a control panel at the helm that alarms when water is high and an indicator light telling me if the pump is running. It's pretty easy and inexpensive to install an event counter on the pump, and that might be another handy device to have on board.

On past boats I've owned, bilge pump access has always been one of my pet peeves, and production builders seem not to care about ease of access. On this boat, I've tried to make all systems components within easy reach, and have avoided burying components to a point that maintenance becomes difficult. The bilge pump in the cabin area and lazarette are extremely easy to access and I'm happy with their placement. The 3600 GPH pump in the engine room is a different story, but I think I came up with a good solution to make this pump easy to service.

Hindsight being 20/20, I wish I would have moved the main engine forward in the boat by 8 or 10 inches. I placed the main engine as far forward to the center of the boat as possible, leaving the engine 8" off of the main bulkhead. That 8" separation gives me enough room to remove the belt guard bolts and be able to service/replace the serpentine belt on the front of the engine. The problem is that 8" really does not give me enough room to access the bilge pump which is under the engine, on the port side, and up against the bulkhead. The real problem is that the bilge under the engine mounts, is over 24" deep, and making pump connections will be extremely difficult at best. The other issue complicating this job is that all the hydraulic lines for the steering, bow thruster, and anchor winch penetrate the water tight bulkhead in this area, so access is not only tight, but it is crowded. The hydraulic lines received the premium real estate in the bilge and penetrate the bulkhead at a high elevation which makes them relatively easy to connect.

The solution I came up with for the engine room bilge pump was to make a bracket on a post and mount the pump to that. The pump mounting post then screws to the bulkhead wall. I installed plywood on both engine room bulkheads, and that decision is paying some dived-ens given the amount of equipment I've attached to the bulkheads without worrying about hitting a nailer. The flexible 1 1/2" bilge pump discharge line is already connected through the bulkhead before I lower the pump in to place. I make the pump to discharge connection while the pump is out of the bilge, make the wire connections, then lower the pump on it's bracket in to the bilge, and bolt the bracket to the bulkhead with four screws. Removal or installation of the pump takes less than a few minutes. The thing I like about this way of mounting the pump is that if I event suspect the pump has a chance to get oil fouled due to work being done in the engine room, I can easily lift it out of harms way, do my work, then easily and quickly replace it. I have about five or six hours in making the bracket and tweeking it, but for me, this is time well spent. I know the older I get, the more difficult it is going to be to cram myself in tight places, and being able to easily service this pump will make life on board much more user friendly. Now that I've had the pump in and out of the bilge a few times, I'm totally happy with this set up as it's a breeze to make the pump connections while the pump is sitting on the engine room door's threshold.

For the lazzarette pump and forward cabin pump, I fabricated some stainless steel brackets. The pump base bolts to the bracket and the pump snaps to the pump base. I tapped threads the metal the fabricated bracket screws to so I could use 10-24 stainless machine screws to mount the bracket. These pumps are easy to access by so no fancy post contraption needed to be fabricated.

I kind of frown on boats that have a rats nest of wire and wire nuts dangling in the bilge for the wire connections on bilge pumps. I decided that I want all my wire connections in a good junction box, so that's what I did. For me, it's all about future maintenance and not having to contort myself for basic service work.

I don't have the hydraulic crash pump installed and probably won't have it for a few years. I've made all the plumbing preparations for the pump in regard to the bulkhead penetrations, and the hydraulic circuit. This pump, more than likely, will not get installed until we get the boat in to the gulf a few years from now.

The engine room bilge pump and forward cabin pump discharges along side the water tank fill manifold on the port side of the boat. The discharge lines loop 12" above the discharge port then drop back down to the discharge port. The discharge port is 12" above the water line.

I'm using a drippless seal for my prop shaft, so I'm planning on a dry bilge in the engine room. Given the boat is steel, I feel as having dusty bilge's is a realistic goal. And while I feel as if I will probably never use my bilge pumps, I want a good installation that is easy to service and maintain so when the day comes that the pumps are needed, I can rely on my end of the work as not contributing to a failure.

Thursday, November 24, 2011

Bathroom update


All the foam in the bathroom has vanished behind the finish work.

I had some green bead board left over from the kids cabin and installed that for the ceiling. I think I'll tone the green down a little and paint it a more neutral color such as a tan. The access panel for the 4" exhaust fan is finished along with the port light trim ring. I also finished the trim work around the cabinet. It's so nice not to see foam anymore.

Since the ceiling and ceiling trim is installed there was no reason not to install the shower fixtures. The shower is now functional including the wiring of the shower sump. I still have to address the faulty sump switch, but someone told me Rule has an excellent replacement policy and as long as the switch is less than a couple of years old, they'll replace it with no questions asked.

I have the hatch framed in out of Cherry, so I'm ready to fabricate the hatch that accesses the shower sump and valves that direct the sump discharge. I'm going to install a new floor in the bathroom as I'm not happy with the Cherry plywood I have under the composting toilet. The fit is less than great, and it bothers me. I ran into a hard wood floor installer I know the other day and he has enough scrap of Brazilian Cherry in his shop that will do my floor. I only need about 15 square feet and the few dollars a square foot I"ll pay him is extremely fair to me.

I installed one 7 watt LED can light in the bathroom. In a perfect world, another light would be ideal, but the one light does the job and gives the room a nice glow. All the lights on the boat are controlled by wall switches, and I prefer that much more than having a switch on the light. The can light pivots, so we can direct light either in to the shower or in to the cabinet above the toilet.

I think the next move after I complete the bathroom is to do some DC electrical work on board. I want to get the battery cables installed along with the battery control panel for my three battery banks. I can now install the lower air conditioner along with the duct work and then button up the starboard chase way.

Tuesday, November 15, 2011

Passage door update #2


All five passage doors are hung in their openings and have two coats of urethane finish on them. Another fairly large job can be, for the most part, checked off of the list.

Because of having to build the boat in two sections ( hull/ wheel house @ salon), I cannot install the ceiling in the hallway and master cabin. Because I cannot finish the ceilings, there is no point in casing the doors, so that job will wait until the boat gets to the launch site.

I purchased a mortise lock set for the master cabin bathroom door. The lock set is solid brass with a brushed nickel finish so my hope is the lock set will handle corrosion. I installed the lock set and I'm happy with how it looks and works. Installing a mortise lock set is a slow, time consuming job with very little room for error. I roughed in the mortise with a 5/8 forstner bit, then cleaned out the mortise with a chisel. I had to make a jig to hold the door plumb with my drill press, and other than cutting the mortise a 1/4" shallow, all went well. From start to finish, I had about 2 1/2 hours in installing the lock set with 1/2 of an hour consumed with building the jig for the drill press. The lock set has a dead bolt so we can lock the door from inside of our cabin. I think I'll have dead bolts on our cabin doors, and the bathroom doors, but will use lock sets without dead bolts for the other doors.

I brushed two coats of gloss urethane finish on the doors. I'm not incredibly happy with the finish and I think I'll spray the final coat of finish on the doors. No matter how hard I try, I just can't seem to brush a good finish on my work. I think my problem is I'm expecting too much out of two coats of finish. Next summer, when the boat is at the launch site and we're putting the final finish coats on everything, I'm hoping I'll get some help on getting a decent top coat on all the wood. For right now, everything is getting two coats for protection, and that's the story I'm sticking with.

The next job is to get the bathroom completed. There is really not a huge amount of work left to finish that room, and I should be able to get it off of my list in a week or so. I have to install the exhaust fan, install the ceiling, fabricate the interior trim ring for the portlight, and install the portlight.

Sunday, November 6, 2011

Passage door update


All the passage doors are built with three of them hung in the openings.
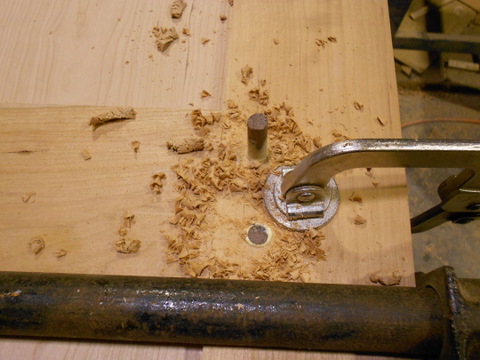
Like I said in my last post I decided upon mortise and tenon construction for these doors. Just to give an extra added bit of strength to the joint, I through pinned each joint with two 3/8" wood dowels. The day I needed the dowels ( more of my great scheduling skills), I went over to the wood working supply store to get a few things and some Cherry dowels. The store was out of Cherry dowels, and in my haste to get a door assembled, I decided to make the dowel a design element, and went with Walnut dowels. The dowels all but guarantee the joints will never pull apart, and to be honest with you, I like the dark contrast of the walnut dowel. I think the doors will really pop once I have some finish on them. In order to prevent blowing out the back of the door while drilling the dowel, I clamped a block of wood where the drill exited the door.

The door project has put a serious hurting on my pile of air dried Cherry lumber, and I'm going to have to harvest a tree or two before too long so I can have dry lumber by next summer. I really do not have enough time to air dry by next summer, so I might be building a solar kiln late this winter to speed things up. In order to save lumber, I decided to buy a sheet of 3/4" Cherry veneer plywood, rip the jamb stock off of the ply, then miter the stock back against itself to make it look like a solid board for the jambs. This worked out well ( more of a suggestion from Captain Ted of LTS Builders), and only took me an hour to rip all the plywood, miter all the end caps and glue and nail theme together. All told I fabricated ten jambs in an hour. I used my brad nailer to pin the miter pieces while the glue set up. You will not see the nail holes as I held the nails away from the miter, and my door casing, with its 1/4" reveal, will cover the nails.

The lumber pile is for sure on the down hill side of the ride, so I had to use some pieces that had a few flaws. My biggest concern regarding lumber quality was finding straight grain, and no cracks or checks. The styles and rails are 4" wide, and while it seems it would be easy, finding ten, six foot long pieces, that I could mill into the correct width with no cracks was a challenge. So given those search parameters, I used some pieces with bad knots. A bad knot is what I call a dead branch knot, meaning a dead branch created the knot. Dead branch knots will fall out or have rot around them. I dealt with the knots by routing them out the same way a dentist would remove a cavity, I then filled the excavation with a Dutchman patch. I really like the character the Dutchman patch gives the piece, and like not having to waste wood. I built five doors and I had to make four Dutchman patches.

I'm pre-hanging the doors on my plywood jambs the same way a pre hung doors comes to any building site. I should have the doors hung and cased by the end of the week, then I'll get some finish on them.