
Once the day head was built, I looked at the space created between the day head and the aft salon wall. There's a boatload of plumbing and fuel tank related parts in the starboard aft corner of the salon, so building an access panel for future access to these parts was necessary. Since I was looking at that corner, I decided I wanted to house the stereo in that same access panel. Once I had the stereo in my mind, I started looking at a book shelf, and once I got the book shelf was stuck in my head, I realized we had no place to stash garbage. Designing by need, or seat of ones pants, is my MO, so now the small planned access panel morphed into a multi-use, built in cabinet with doors, shelves, and wiring . Going with a larger inside dimension of a built in book case, I decided to make the interior 13" deep, which gives an overall depth including the face frame of 13 3/4". The built in is 41" tall.

With the now 13 3/4" built in planned, I looked at the remaining space between the built in and the day head and was happy to find I still had 6'7" of space.... plenty of room for two comfy reclining chairs.... I think. Measuring some chairs at home had me feeling good about the space, but a field trip to the furniture store was in need, and once that was completed, we settled on a reclining love seat with a console between the chairs ( chairs recline independently). The recliner can be as close to one inch off of the back wall vs 8" for reclining chairs, and measures 6' wide. I've been on too many boats that don't really pay much attention to comfortable seating, and I don't want this boat to be one of those.
The built in lays out with the garbage closet, with a door, on the end, and the stereo above it. There will be two or three DC receptacles next to the stereo for charging phones or other devices.
 The cabinet top, which is 14 1/4" deep, is large enough for a lamp, along with being able to lay IPods or IPads can on the cabinet top so they can plug in to the stereo. The book case is is in the center, and will probably have three shelves, possibly four. Next to the book case is the plumbing access panel on the bottom and another cabinet with door above that. The holding tank vent exits through the roof of the boat in this corner along with sharing space with the water feeds for the day head, and washer/dryer. The garbage bin should be closer to the galley, but it is what it is, and it's not that far of a walk to reach it.
 Because the aft wall is only 2 1/2" thick, I'll be fabricating a trim piece to apply for these two windows, so no sill. The other six windows in the salon received a sill, jambs, and casing. The casings are 1/2" thick, but the head casing is 3/4" thick. I did this so I could butt the side casings in to the head casing and have a 1/4" reveal.
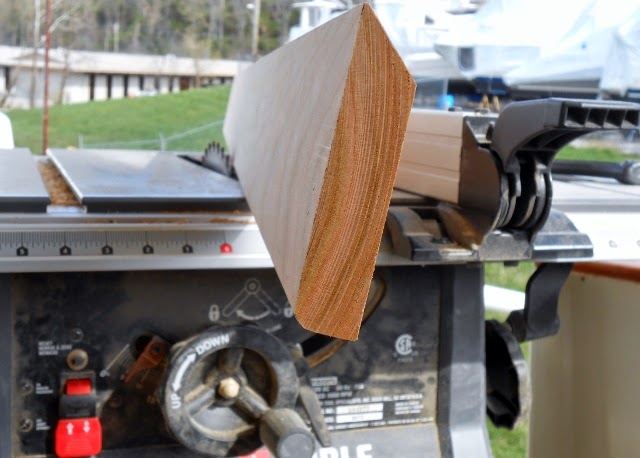 The joint looks good as I rounded over the head casing on the side casing edge. On the top of the head casing, I cut a 45 degree bevel to give the trim that's going to hide the access chase's some place to sit.
 This detail works nice as the chase cover has a firm place to land and only will require a few screws through the board in to the ceiling to hold it fast.
  Because the board lays in the 45 degree bevel, it also gives a nice tight fitting joint with no fussy fitting. Holding the head casing down 1/2" gives a nice place to hide the rail that the window curtain will slide in. This detail worked out nice and the best part was how easy it was to fabricate and how tight fitting it is going to look.
There's still a day's work left before I'm ready to put some finish on salon, but like the post title say's, I'm close. Once there's three coats on the walls, I'm going to glue down some floor underlay and bring in the remaining cabinets. With the rest of the cabinets installed, the the six inch air conditioning duct can be finalized along with installing the already built settee parts.
Wrapping up the bulk of the wood work by April's end is within reach, but things could creep into May. What's important is that the table saw is moving out of the salon, and I'm getting ready to start eyeballing some mechanical work, which I"m ready to dive in to.
Cheers


.jpg)
.jpg)
.jpg)
.jpg)
.jpg)
.jpg)
Looking real good. :)
ReplyDeleteBill Kelleher
Thanks Bill. The wood working has been fun, but it's time to get it over with. The table saw I'm using on board has an aluminum table, so it can have a tarp thrown over it and moved to the aft deck, or even under the boat.
ReplyDeleteAs always amazing work Conall.
ReplyDeleteThanks Rick
ReplyDeleteOnline reading is not my thing. But after reading your blog I am really pleased. I don’t know about other blogs but this I will definitely keep coming back to.
ReplyDelete