Sunday, August 19, 2012

Wrapping up the super structure metal work

Getting all the little odds and ends completed before I can paint the super structure is taking quite a bit more time than I had anticipated. I'm trying to work out a few problems as once I start paint prep, I don't want to stop to do some welding. Once the boat is at the launch site, I have a feeling I'll be doing some welding I forgot on the super structure, but my hope is that I get it all figured out now.

The first thing I did on the super structure was to install a temporary floor in the wheel house to bring  things close to the finish floor level. After I had the wheel house floor back up to grade I installed all of the cleats and tabs I need to bolt the lumber to. Trying to use up what material I have on hand, I cut my longer pieces of flat bars in to tabs, and wherever possible, used the tabs welded in place to bolt lumber to. Once I have the interior painted, I'll bolt lumber to the tabs and cleats, then have the insulator spray foam the interior of the super structure.

 I'm limited to the wall thickness around the windows to 2.25" due to using the clamp rings. The clamp rings will make for a nice neat finish, but I wish I would have been able to get the rings for a 3.5" wall thickness. I'm able to make the wall thickness on the front of the wheel house 2.25", but the rest of the boat is going to be thicker due to the framing, so I'll have to build some custom wood trim rings to tie everything together.

Once I had all the cleats welded in place I turned my  focus to the welding needed to be done on the super structure roof. The roof work has turned out to taking a little more time than I had thought it would. I am planning for using a LP fired stove in the galley, and I needed a place to store propane. I framed a propane locker on the roof that will be large enough to store two bottles. Even though I'm not going to be doing any fairing work on the roof, I used pipe to make the corners of the propane locker. The pipe corners will paint up nicely, and will require little fairing to make them look good and cut down on future maintenance. The locker has two drains to let wasps in and water and any propane that could spring a leak out. I welded a 1/2" stainless nipple in the bottom of the locker to allow me to plumb the propane supply line in to the galley. The lid for the propane locker will be a simple lid with two pins for hinges and a simple latch.

In the center of the super structure sits the exhaust stack funnel. I'm using a keel cooled main engine and a dry exhaust system. The exhaust system is basically like a truck, and uses a pipe to bring the exhaust up and out of the boat. Along with the exhaust from the engine, I'm using the exhaust funnel to vent the hot air out of the engine room. I also am using the exhaust funnel to bring cool air in to the engine room. In order to do this, I partitioned the exhaust funnel in half, with one half dedicated to getting hot air and exhaust out of the engine room, and the other half for bringing cool intake air into the engine room. The largest hole I could cut in to the exhaust funnel at what I would consider an elevation where the hole would actually do something was 12"x16". So I have a 12"x16" hole for the intake, and the same for the hot air exhaust. I purchased a cheap coil stock louver from Lowes to see how it would work out, and I'm going to buy some better quality louvers for the final install. I'll probably use the cheap louvers over the winter just to keep the weather out. Removing the louvers is also how I'll gain access to clamping the exhaust pipe to the 4" stainless pipe I welded in to the exhaust funnel top.

I like the way the exhaust funnel looks and in order to keep things looking good I had the metal formed on a press brake. The fab shop owners is one of my neighbors and it was fun helping him do this small job for me. The exhaust funnel is tapered so there are two different radius's on the piece. In order to get the different radius's Mark set the machine to hit harder on one side than it did on the other. His machine is a Cincinnati 300 ton press brake, and was built in 1942. Cincinnati is a good brand, and this machine was built in a era in this country that has faded fast. We need our manufacturing jobs. Mark laid the pieces out for 20 hits per piece, and in this picture, you can see him lining the die up to hit on his punch marks.

I welded a four inch stainless pipe in to the exhaust funnel. I'm thinking about running the exhaust stack up the mast, and if I do that, I'll probably either do that in chrome or stainless. If I don't run it up the mast, I'll clamp a stainless or chrome 45 on the the nipple and call it done. I have room for a silencer on the exhaust piping, but for right now, I'm not going to install one. If I run the exhaust pipe up the mast, the outlet will be so high and with the wind blowing the sound away from the boat, I doubt you'll hear it. You might hear the whistle from the turbo, but I think that sounds good. I can always add a silencer if I need to, I just would rather not as they get hot and it's just one more thing to buy and maintain.

The inside of the exhaust side of the funnel will be  insulated to help keep the heat headed up and out. I'll post more on this later down the road, but I'll be using some fans in the engine room to help air get in and force warm air out.

The salon roof is where we'll be storing our skiff, bikes, and kayaks. Because of having to work up there, I decide to install a hand rail around the salon roof. I'm not ready to install the hand rail, and really don't want to do that job just yet, so I decided to cut some 1.5" discs to act as a doubler for welding the 1"  handrail stanchions to. By using the doubler discs, all I'll have to do is sand the paint off the disc and weld the stanchion to the disc. The disc will act as a heat sink and not burn the paint from the outside or inside of the roof. I'll be TIG welding ( Norm F. @ Kevin M ) the hand rail together, so splatter will not be an issue. I cut the disc on my mill using a hole saw and cooling the bit with water. The disc will also look decent with the hand rail stanchion, will not look like an afterthought, and allows me to keep things moving as doing this work is a hell of a lot easier with the hand rail not installed.  As per my locating the hand rail stanchions over a frame, I have kept in line with over building everything. The hand rail stanchions ended up being 30" on center.

I also will need a cradle for our yet to be designed skiff ( Kevin M), so instead of figuring out a cradle for a skiff I don't own yet, I just welded some 12" long x 3" wide doubler plates where I plan on building the skiff cradle. A 12' long skiff will fit nicely, but a 13' would also fit albeit tight. I'm going to build the skiff in aluminum, but that won't be for another two years. Getting a little off subject, I sure would like to weld part of the cradle to act as a fuel tank for storing gasoline for the skiff. Again, the doubler plates will allow me to build the cradle later without destroying the paint outside or inside under the finished ceiling. The plans I'm looking at for a skiff is 12' long, 5' beam, powered by 20 hp, and can carry 1000 lbs. It will weight about 300 lbs when completed.

The last roof job I need to complete is welding the tabernacle for the mast along with the pad eyes for the mast fore stay and shrouds, and brackets for flopper stopper poles. Flopper stopper poles are poles that extend away from the boat when at anchor and allow you to hang a device that helps mitigate rolling of the boat. I accepted some advice from an engineer I know and am reinforcing all of these parts to be robust enough to accept a more demanding paravane system to help with rolling while we're under way. Because I'm building a lot of these parts out of 1/2" stainless, I had to develop a cut list and have a local shop cut all the parts for me on a band saw. I just got all the parts back from the shop the other day, and I'll start putting it all together this week.

By the end of the week, I'll be able to move the welder off of the roof and finish a few simpler jobs on the aft wall of the salon. Primarily, the fill and vent points for the fuel tanks, the outdoor shower brackets, cutting the starboard side of the salon  so the boarding door works, and a few other smaller brackets. I feel pretty good that I'll be prepping for paint in a week or ten days, and should be done painting by mid September.. I might sneak away from work a few days to make sure I can get all this done, but early October looks to be about when I'll be moving her out.  

Sunday, July 29, 2012

Super structure

Now that the salon is fabricated and welded to the wheel house, I will officially call this the super structure.

The wheel house was fun to build because it has such cool design elements and it's the wheel house. The salon was fun to build because building these structures goes so quickly that you really feel like you're getting something done. Now that I've been welding on the super structure for the last week, I'm ready for this part of the build to be finished. I can tell you that 90 % of the welding is finished, and if I didn't run out of welding wire this morning, the job of heavy welding would have been almost complete. I say almost complete because once I'm finished with the heavy welding I still have a few small jobs to complete including: all the window stiffeners and nailing cleats need to be installed, the doubler plates for the hand rail and dingy cradle, the vents for the composting toilets, the mast step, mast framing, and mast rigging pad eyes. I also need to weld  future brackets for paravanes, and bushings for the ladder that will be used to gain access to the roof. This is still a fair amount of work, but the hours and hours of heavy over head welding are behind me and whats left is not really that much. to do.


The salon measures about 14 x 14. The original design had it measuring 14W x 16L. I wanted more space for a larger cockpit so I increased the size of the cockpit by 2' which shortened the salon by 2'. Was this worth it? I think so. For me, lounging in a chair under the cover of the cockpit roof will be a great place to hang out. I also think I can now have a hot/cold shower in the port side corner of the cockpit by using a  curtain on tracks. The extra shower will be a  huge asset. There is now enough room for a small table and four chairs along with a moderate sized grill. This is a wide body design, so there is no side deck to get from the aft deck to the fore deck. Because of this the salon bumps out from the wheel  house by about 24" on either side. The deck from the wheel house terminates in the forward salon wall. Using the step up to the wheel house, I'll  gain access to the salon roof via a ladder that will be mounted on the wheel house deck ( more on this later).

To build the salon, I had to jack up the wheel house to get things in the relative position on how the boat decks step up as you move forward ( raised pilot house design). The wheel house is now pretty high above the barn floor, so I'm going to have to install a temporary floor to paint along with scaffolding on the exterior of the wheel house.

The door in the salon is off centered to port because the salon table/settee goes on the port side. That port side corner will be nothing but table, so by having the door favor that side, we have more room on the starboard side for other things.  

To increase the size of the cockpit I had to alter the bulkhead where the salon door and windows is. Because this wall move forward, I needed to install a 1" filler piece on either side of the bulkhead. This was a fairly small change that has required a little bit of noggin work. The real challenge with moving this wall and the small design change I made to the cockpit was the starboard boarding door I added. Adding the boarding door now requires me to cut the starboard salon side panel in such a way as to not offend the very cool line the designer had originally drawn. I need to put some good though in to cutting this panel to make panel look as if it was not some aborted afterthought.

The other change I'm going to make to the salon aft wall is I'm going to increase the size of the door going in to the salon. Right now, the door width is 25 1/2". I'm going to increase that door size to 32". 32" is not a huge door, but it does feel much better walking through vs the 25" door. The larger door will also make getting the stove and fridge through the opening much more doable. I'm still debating on making the door a 36" but that seems large. Since I"m building the doors myself I should probably go larger. I open to suggestions.

The salon roof over hangs the salon wall by 5". The design has a piece of trim that forms a soffit similar to a gutter board on a house. The ceiling I'm going to install for the cockpit roof will tie in to this soffit on the same plane and make for a nice, neat looking finish. The ceiling will have about 4" of clearance so I"ll be able to install some LED cans for some nice lighting.From a construction point of view regarding the clearance allowed for ceiling material, I wish that the designer had allowed a little more reveal so that using 3/8 ceiling material would still allow 1/2" of the metal trim piece to be seen. Right now, using 3/8 material will allow less that a 1/4" of  reveal, and in my opinion, that's cutting it too close. The last thing I want to see for aesthetics and maintenance, is the ceiling material below the metal trim. I also don't want to use 1/4" ceiling material, but I will it means seeing the ceiling below the trim.   Some of the push boats that work up and down the Ohio river have taken to running some accent lighting as they move at night. I think I'm going to install three LED cans in the soffit centered above the salon windows for accent lighting. A lot of the push boats use a blue light that I think would look sharp as long as it's not to bright.

The salon has 8 windows and all of those are sliders with screens. I went with a dark tint on these windows as I feel the tint helps with the heat.The windows are about 37 x 23... not hatefull huge, but a nice size. Before I paint, I'm going to test fit .

I"m a little behind on my schedule as I was wanting to be starting prep work for paint this week. Being realistic, I won't be fully into paint prep work for another week and a half. I still think I'll be finished with painting the super structure by the end of August but it's going to be tough. My plasma cutter went down on me today and that's going to slow me down. When you operate on a shoe string as I tend to, small problems can cause delays. I guess the positive aspect of operating on a shoe string is that when small problems pop up, I'm flexible and easily able to switch modes.

All in all the super structure has been fun to build, but like I said above, I'm ready to be done with it. Another week or so, and I"ll be full blown into paint prep and that will be a good thing. I'm sure, as I'm now singing the welding blues, I'll be singing the paint prep blues in a few weeks. As you might be able to tell from some of the pictures, the shop is about as full as it can get. There's still room to work, but it is very tight. I'll be able to take the gantry down once the funnel is in place, and that will help with room. I not so sure I'm going to know how to act once the good ship Conall leaves the barn with all the room I'm going to inherit.

Wednesday, July 18, 2012

The wheel house

The wheel house has now become my new favorite place on the boat..Before I built the wheel house, my favorite place was a toss up between the engine room and my cabin. I've never owned a boat with a wheel house, but I can without a doubt say that the wheel house is huge. The other thing I can say about the wheel house is that, the designer got it right when the designed the reverse rake of the forward windows and the trim ( the bill that extends from the roof) for the wheel house roof... it's perfect. I've seen some pictures of other boats of my flavor completed by others, and a few of those the builders decided not to install the trim as designed. I have always felt that it took much away from the look of the wheel house, and not that I've seen it up close and personal, I now know it to be a fact that eliminating the trim detracts from the look of the boat.

The first step in getting serious about building the super structure was to build a gantry. The left over 4" beams from the building cradle strong back provided most of the steel to do the job. The main lifting beam I had saved from the gantry I used to build the hull. Because things are getting tight in the shop and the gantry just fits between the metal lathe and the hull, I had to pad the gantry with a canvas tarp to prevent it from gouging the hull and causing me some serious paint repair. I"m so glad I decided to do this as the gantry has already bumped the hull. I can say that the rub rail is working.

Having previously assembled the side walls to both the wheel house and salon, the wheel house went together pretty quickly. The first thing I did was establish a center line on the barn floor, then squared another line off of that. The squared off line became the line for the wheel house front. Positioning the various panels in relation to the line and bracing them was about all it took to get the show started. Once all the panels were in place, I then installed the roof beams and the  room longitudinal stringers. The roof sheathing, obviously was the last item to be installed. Because of having all the layout lines laser etched into the sheathing, it was just a matter of putting the blue line on the roof sheathing on top of the  side wall and tacking the sheathing down. The roof sheathing is what squares up the structure, so paying attention to detail for this part of the build was a key strategy. I first tacked the sheathing in the forward corner then worked my way down one side bringing the side wall to the layout line and tacking the pieces together. Because the roof sheathing is now tacked to the side wall on the layout line, I then started to bring the  forward part of the wheel house to the layout line of the roof sheathing and tacked it in place. I started this process from the same corner. A lesson one learns quickly with metal work is never tack yourself in to a corner...always start from the closed end of something and work your way outbound. The other strategy with metal work is to tack all your parts together first, and leave the serious welding until  EVERYTHING IS TACKED TOGETHER.  Welding generates serious heat and caused the metal to move quite a bit. Final welding before you're finished fitting will only cause one grief. Now that I had two  panels tacked to the line, the third panel easily moved to the line and was tacked. I then installed the aft part of the wheel house and the box was complete.

This part of building the wheel house went together rather quickly and only took me about a day of work to get it finished. The trim for the roof section was another story. The trim wraps around the wheel house and creates a drip edge to keep water from running down the sides of the wheel house. The forward piece of the trim extends down over the room sheathing a little further than the side trim, and  creates a bill to keep the sun out of the captains eyes. It's the exact same as wearing a hat, and not that I see it installed, I love it. The other piece that gets installed to complete the trim is a piece that angles up from the room at 45 degrees, and welds to the bill. This 45 degree piece creates a gutter on the inside of the roof and also stiffens the bill piece of the trim. The gutter piece is another nice detail that will make painting and maintaining this part of the boat easier. There are no tight crevices for bad things to start working against me and everything is open and easily reached. This same gutter detail will be repeated on the salon roof, and all the rain will  travel this course and discharge overboard without hitting the decks. There will be a lot of rain running this path, so I need to have a way to capture it and get it in to the water tanks if the need arises. All the trim parts when installed ended up having funky angles with compound bends. The funky angles and compound bends required some patience, and about as much time to do as assembling the main wheel house panels, but in the end it was worth it. All of the trim is fair and  should paint up nicely.

I"m ready to start on the salon, and once that's in place, I'll final weld all the seams for the super structure. Because the deck of the boat falls from bow to stern, the back of the wheel house is sitting on the barn floor with the front up on some blocks. Before I can assemble the salon, I have to jack up the wheel house the same distance as the step that is decks. I could leave it as it is, but that would mean being crouched over as I build the salon, and that won't work for me. I'll probably end up putting in a temporary floor in the wheel house to make painting the inside easier.


This picture shows a little more detail on how the gutter is formed and how the designer projected the trim to hang over the wheel house walls and create a drip edge to keep water off the wall. I like the way this was cut, and I love how fair and subtle the curve of the wheelhouse wall is. I actually think I found my first error in the cutting file. The trim you see to the right is about four inches short of where it needs to finish. I'm not going to do anything until I have the salon welded to the wheel house. If this is a cut file error, it won't be that big a deal to fix by extending these two pieces another four inches.


 In case anyone is curious, I now have a tarp hanging off of the hull to prevent any damage to the paint from grinding and other things I'm doing while building the super structure.

Cheers


Thursday, July 12, 2012

Ships log

Boat position: N38* 57' 46.03"  W84* 14' 45.13"

Nautical miles traveled: .0006583

Engine hours: 0

Captains state of mind: Hmm?

What's this all about you ask? The reason there is a small percentage of nautical miles traveled is because the boat moved. The reason the boat moved is because it's sitting on the axles that will move her to THE LAUNCH SITE. The reason I moved the boat is because I could.

The move of the boat represented about two feet forward, then two feet back. It was a pretty easy thing to with a little nudge from my skid loader providing the power.

Getting the boat on the axles was a pretty straight forward job that consumed some hours. The first thing I did was reinforce the bow section of the building cradle. Since the aft section of the boat was getting lifted the highest, I decided to jack up this end first, and then do the bow. I was afraid the lifting cradle on the bow would not handle the shifting, forward push of the load, so I added some bracing to the cradle. The next step was to build cribbing using concrete blocks on the port and starboard side of the boat to catch it if something bad happened. I knew it would not twist off of the jack since it was supported by the bow cradle, but if the bow cradle failed, and it dropped down on to the cribbing I had under the bow, it could roll off of the jack, hence the cribbing on the sides.  I used a 30 ton bottle jack under the keel and a frame member to jack the boat up. I also placed cribbing along side the jack in case the jack failed.

The boat  went up off of the jack stands smoothly, and without any hiccups.  I was pretty pumped to see it separate from the building cradle, and slow was the speed I chose to operate at. I would lift if a couple inches, then stop and take a walk around to see how it was behaving on the bow building cradle. Once it was high enough, I would add some wood blocks to the temporary side cribbing to keep the distance to the hull close, then lift it some more. I guess it took about an hour and a half to lift it the 14" I needed to get the axle under the keel. Most of the time was me checking things out and going outside the barn to chain saw more wood blocking as she got higher.

Being able to jack this boat up from one point gives some testament to how stout she's built.  

I had the axle under the boat before I started to lift her, so once she was high enough, I rolled the axle to the final position the squared the axle to the hull. Since I still had the cradle strong back in place, and since the hull was built square to the strong back, I just measured off of the strong back and positioned the axle off of that. Because the rear axle is so wide, the cradle strong back prevented me from  putting two of the four wheels on the axle while the strong back was in place. Once the axle was in position, I torch cut some of the strong back away, and put the two outer wheels on the axles. With all four wheels on the axle, I lowered the hull on to axle. I was amazed at how much the axle started to deflect, but due to me reinforcing the tube, the deflection was minimal. Once the load was fully on the axle, I lightened the load a bit and fabricated the stanchions that will prevent the boat from tipping off the axle. To pad the hull from the stanchions, I cut up pieces of rubber mud flaps and put them between the hull and the stanchion pads. Once the stanchions were in place, I lowered the hull on the axle and moved my operation forward.

Placing the hull down on the forward axle was much easier and went pretty quick. I just had to jack the hull off of the forward cradle, cut the cradle and strong back away, then roll the steering axle in place. I took a few measurements, and made sure the steering axle was parallel to the rear axle, placed some two inch blocks on the I beam cross members I had made for the steering axle, and lowered the hull on to the steering axle. The only hiccup I had doing this was when I was putting the hull on blocks so I could move the jack, two of the concrete blocks broke, and I had to replace them. The loud popping of the block made me jump a bit, but it worked out OK. As I placed the full load of the hull on to the steering axle, I quickly realized the tires are not beefy enough. If I tried to haul the boat with those tires and as much as the tires have bulged, the tires would quickly heat up and blow out. A blow out would be sure to happen even at the slow speed I'm going to be traveling at. I kept more of the load on the keel blocks, and a call to my tire guy assured me I could replace the 10 ply tire with some larger 24 ply tires that would make the trip. I'll deal with replacing the tires in a week or so.

The hull is now about 18" out of level so very little work will be done up there until she gets to THE LAUNCH SITE. There are a few little jobs I need to get finished before I haul her out of her nice cozy barn, but my main focus will be  getting the super structure ready to install. Now that she's on the axles, I measured her down the road height at 14' 5". This height is lower than I had originally thought it would be, and that's a good thing as wires should be of little issue. I will clear the highway overpass by more than a foot and a half, so for right now all is good.

Now that the hull is on the axles, and I have the cradle removed from the shop, I am moving on with getting the super structure put together. The panels are already built, and now that I have the cradle steel available to me, I'll put together a gantry and get on with some more building. The building part of this type of project is fun, with all the devil in the details. I'm not going to make any promises, but this next part of the build should go pretty fast.

Cheers,


Monday, July 2, 2012

Work has started on the super structure

The axle work continues, just not by me. Due to me being busy with work and not wanting to mess with re building the dually axle I procured, I happily delivered it to JCM Equipment so they could put bearings in the axle. This axle has turned in to a loosing deal, but I'm too far in to it to call it quits at this point. The easiest way to explain the dual wheeled axle I got for free is that this has been  the most expensive "free"  I've ever found. I should probably end this thought with a Gumpism and say that "this is all I have to say about this right  now"

So, while I wait for the axle to  be picked up from JCM, I started work on the wheel house and salon, which I will now call the super structure. All the parts for the super structure were scattered around the barn years ago, and it took me half a Saturday to round them up and inventory everything I actually  had some of the long frame pieces stashed away in the roof truss's. I found everything, and checking my stash against the working drawings, every piece is accounted for.

After inventorying all the parts, the first order of business was to drill all the frames for the bolts that would be used to fasten the framing timber with. One of the mistakes I made on building the hull was to not drill all t he frames before I erected them. Drilling on the drill press will save me hours of work. Using 1/4" bolt is what I plan on doing, so I drilled all the holes to 5/16. The overage gives me plenty of room for paint and will help prevent skinning up the hole when I drill for the timber. After I drilled all the holes, I used a counter sink to ease the edge and give me a more paint friendly hole.

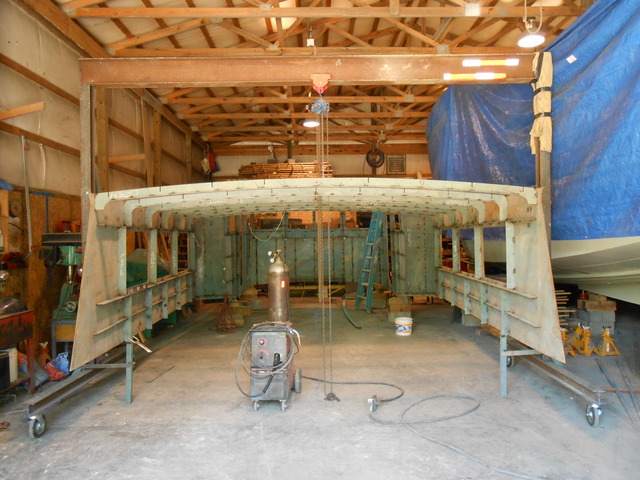
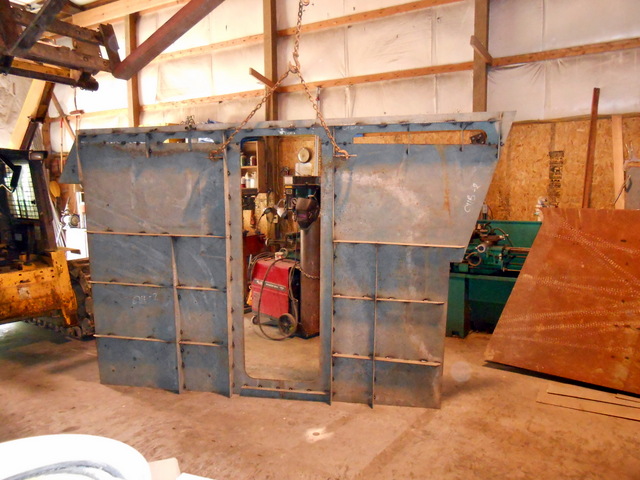
When you break the super structure down in to it's most simple form, it's basically a box. Four sides with a roof. Because of having to build the boat in two pieces, it also made the most sense to build the super structure as panels. Assembling the panels went very quick. Because all the parts were cut on a CNC machine, the accuracy of the parts is amazing. The really nice thing about having the metal cut via CNC is that the designer also had all the layout lines burned in to the metal. My appreciation to Bruce Roberts and Hal Whitacre on their attention to detail. A nice surprise I discovered while assembling these four panels is that the designer gave each panel a slight outbound crown. The crown is slight enough, about an inch over the length of the 16' salon panel  you see hanging from my skid steer loader, but not so severe as to interfere with the window installation. I don't know the reason for giving these panels a slight crown, but my guess is that the crown puts some tension on the metal and will help it to fair up much nicer.

The salon skin showed up at the shop with the window openings already cut out. The wheel house has the window rough openings burned in to the metal, and only the door openings are cut out. I'm going to wait until I have the panel welded in place before I cut out the windows.  I already have the windows on site, I just want to wait  until the panel is in place as this will be help keep the panel shape as per design.

You can see on this picture below how the wheel house sheathing arrived at my place. The precision of the CNC plasma cutting is amazing. As you can see from this picture, the wheel house side is in three pieces. All I have to do is grind a bevel in the outside joints that will be ground flush. Turn the pieces over, kick them together so they line up, and tack them. The next step is to put the longitudinal stringers on the layout lines that were laser burned in to the metal and tack them in place. Making sure the sheathing is tight to the longitudinal stringers assures the panel will take the shape the of the design. Once all the longs are tacked in place the frames are fit over  the longs and tacked in place. The frames have all the notches cut in them including the mouse holes so no water can get trapped and start a crevice corrosion situation. The longitudinal stringers were also cut by the CNC machine so the designed shape is formed by the longs.  On this size project, with all the framing I had to do, I have yet had an situation where no part fit any less than perfect. 

All the panels are assembled and stacked against the barn wall while I begin taking the boat off of the building cradle and sitting her on the axles. JCM has told me the axle will be ready for me to pick up mid to week. I have to make a trip to the steel yard and pick up some square tube to build stanchions for helping support the boat on the axles. I hope to have her sitting on the axles after this coming weekend.

I'm feeling pretty good about finally being able to assemble the super structure. It's a big piece of structure, but I feel as if it will go together quickly and without any major hiccups. I am pretty sure I have a plan that will allow me to do some good layout and build the super structure so that it will mate with the hull in a good way.

Cheers


Cheers

Monday, June 25, 2012

Axle work


I started work on the axles to haul the hull to the launch site. The front axle for the hull will be a steering axle, and the rear will be a dual wheeled axle.

The reasons for sitting the hull on axles vs having it hauled by a commercial boat hauler are a few. The main reason for going this route are that I had two boat haulers look at the job and both did not want to make the trip down my driveway. Our driveway is fairly steep, greater than a 30% grade, and paved with gravel. For a truck pulling a heavy trailer, getting up it is also a challenge as the truck drive wheels will spin in the gravel and rubber gets torn off. The other reason for using a home made dolly to haul the boat is the clearance I have to have getting under a highway over pass. The over pass measures 16' exactly, and as the boat sits on the cradle she measures 15' 11". Putting her on a trailer would raise her up over 16' and would require me cutting off the bowsprit handrail. Another reason for not using a commercial hauler is that I built the boat in the barn backwards. I should have built her bow forward pointing out the door. Getting her out of the barn will still require a dolly of some sorts given my ass backwards way of building her, so I might as well leave her on the dolly and haul her to the launch site myself. Why did I build her in the barn backwards? I have no idea, but I can't cry about it now.

Getting her on the axles has run into a snag. I've finished the front steering axle, and it's ready to go under the boat. My plan is to jack the hull up, sit the hull on to the  steering axle, then fabricate some stanchions to hold her steady. I'll then weld some two "D" rings to the hull and two "D" rings to the axle and use some chains and binders to hold her fast.

I had to fabricate a hitch/steering arm to make the front axle work the way I want. I used some 3" schedule 80 pipe for the hitch arm, and fabricated a pivot joint using 1 1/4" round stock and thick walled tube for bushings. I bored the tube on the lathe to .005 over the pin diameter to make things fit a little easier. The hitch arm will swing left to right, and by welding an arm to this and connecting that arm to the linkage on the steering axle, the wheels will "steer" and follow the hitch arm. Because I have to connect the hitch arm to the haul truck, I welded another pivot point turned 90 degrees to the steering pivot to allow the hitch to also move up and down. Basically, I created a home made "U" joint. Once the hull is out of the barn and I can figure out how long the up and down part of the hitch needs to be, I'll join the two together. Right now the hitch arm is about 4' long.

The snag I ran in to has to do with the dual wheeled axles for the rear. A friend gave me the axle but once I saw it up close I knew I did not want them in the shop as they were. This is a pretty old axle and it  had two piece wheels that were in bad shape and what I viewed as very dangerous. I called the tire shop that sells me equipment and they told me they could get me some used wheels and rubber that would be safe and make the trip to the launch site. When one is working on two piece wheels, the wheels should be place in a steel cage in case the lock ring on the wheel fails ( the two piece part of a two piece wheel) and blows apart. The mechanic at the tire shop must not have followed this practice as the wheel lock ring came off of the tire and hit him in the leg with enough force to break his leg. He's lucky he still has his leg, and even more lucky he's alive. The tire shop is still going to finish the job and has promised me I can pick it up mid week. Once in the shop with newer radial wheels and rubber, I'll have to put a bearing and race in one side, and after that I can get the hull off of the cradle.

Getting her off of the cradle pretty much means most work on the hull is finished until she gets to the launch site. Once off of the cradle, my main focus will be to finish the wheel house and salon. There's really not much more I can efficiently do to the hull so having her remain on the building cradle makes no sense. It will be easier to get her off of the cradle with the barn free of the wheel house so I'm holding off on starting that build until the axles are in place. Also, once the hull is on the axles, she'll be sitting about 18" out of level in regard to the water line, and I don't want to be working on her in that position.

Cheers


Sunday, June 10, 2012

Painting is complete

Like the post title says, the hull is finished painted.Whoo Hoo!!!!

My last post dealt with the port side of the boat, and this post deals with me wrapping up the starboard side of the hull and making a repair on the port side. But the jist of this post is that the paint work is completed, and I can put the paint pot back on the shelf until late August or early September.

I had to make two repairs on the port side of the hull. I prepped the two areas that needed to be re painted but I did not spray them until I sprayed the starboard side. The repairs were a result of a severe orange peel condition up by the bulwark, and a paint pot failure below the lower rub rail. The paint pot failure was some issue of the feed tube not  getting primed correctly or air locking up on me which caused the paint to not flow or atomize correctly. This below the rub rail area looked pretty rough, so I sanded it back smooth. The orange peel issue by the bulwark was a result of  me not leaving well enough alone.When I was painting this area of the hull a few weeks ago, I had lost track of how many coats I had sprayed on this area. I was unsure if I had two or three coats. The area looked good, and I should have left it alone, but being the rookie I am, I sprayed what I thought was a third coat. The prior coat had already dried, so when I applied the not needed coat, it instantly turned to crap and got a severe case of the orange peel. I started to wet sand it out, but the area was too big, and it was going to be faster to take it back down with the DA sander and re paint. I'll have to wet sand out the parting line, but that will be an easy almost relaxing job. Both areas now look good and I'm glad I made the repairs. 

I can't really take a picture of the starboard side as there is only four feet of room from the barn wall the the boat. But I can tell you that the starboard side now looks like the port side, which is shiny and finished. I treated the starboard side the same way which entailed sanding the hull to 320 grit, spot priming some areas, painting the rub rail, then spraying three coats of green acrylic urethane. I'll have to do some wet sanding and polishing on a few areas, but I won't do any of that until next Spring at the launch site. I'll probably end up polishing and waxing all of the hull, but there again, none of that work will happen until next Spring or Summer just before launch.

I am sort of keeping a half baked schedule roaming around in the back of my head. While I'm a week or so later than I wanted to be on finishing the painting, the painting is now complete and I can focus on moving forward. The next step is going to be getting her off of the building cradle. I found a dually truck axle for the rear of the boat and a truck steering axle for the front of the boat. No work is needed regarding the steering axle, but the dually is going to need some work before I set the boat down on it. One side of the axle is locked up and will need bearings and races, and I need to take hard look at the tires. I only have to move the hull about ten miles to the launch site, but the tires are so dry rotted, that I have my doubts about them. Once I have the bearings in them, I might bring the assembly up to the truck tire shop that sells me rubber for my trucks and see if they cant some used skins on the wheels. A halfway decent set of used rubber make me feel better about things than the dry rotted tires now on the axle.

The other reason I need to get her off of the building cradle is that I need the metal from the cradle to build a gantry and the frame for welding together the wheel house and salon. I have over 100' of 4" I beam in the cradle and quite a bit of 1/4" plate. All that will be put to good use for a gantry and frame work for the wheel house job, and will also mean I will not have to spend any money building those two items.

I need to be assembling the wheel house and salon by early July, and needed to be finished with the welding by the middle of August. Finished with the welding means having the hand rails for the salon top welded in place, the engine room exhaust funnel welded in place, the brackets for future paravanes figured out and welded in place, the mast step figured out and welded in place, the pad eyes for the mast figured out and welded in place, lifting rings figured out and welded in place, brackets for the yet to be built dink figured out and welded in place. I'm sure I'm forgetting a few odds and ends, but you get my drift in that time is running out. Having all this completed by mid August gives me a few weeks to finish painting the salon and wheel house, which puts me in to September, which is about when I need to be picking a date to move her to the launch site. The boat yard I'm bringer her to gets busy in late October, so I want all of my work completed before that time and the high end yachts start piling up around me which will cause me trouble with painting.


Cheers