Monday, November 29, 2010

Medicine Cabinet


The last cabinet in the master cabin is the medicine cabinet that resides over the sink. The medicine cabinet is a basic cabinet with solid sides, a ply back, and a frame and panel door. I've yet to assemble the door although I have all the parts cut and milled. I was going to have a mirror made, then use the mirror as a panel and permanently install it the same way as one would install a panel. That method is probably not such a wise idea so I think I'll have a mirror made, then use clips to hold it against the panel. When the mirror gets broken, it will be a simple matter to get a new one.

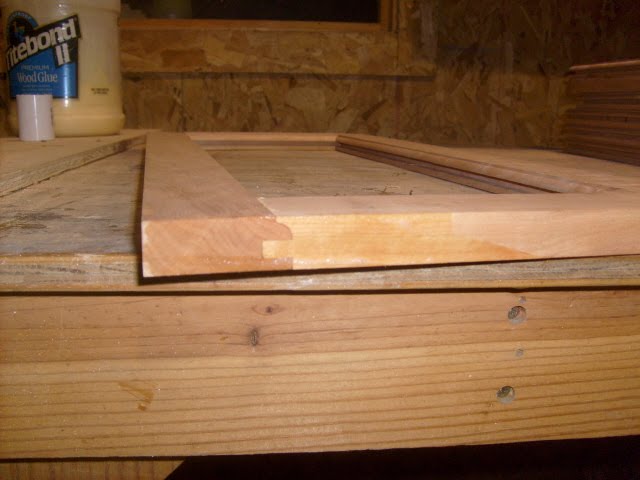
I wanted to add some interest to the medicine cabinet so for the side of the cabinet everyone will see, I chose a piece of highly figured wood. The piece I used came from the crotch of the tree and has a lot of interesting, flame like grain. To add a little more detail to a pretty basic piece, I decided to use dovetails to join the case parts.

I hand cut the dovetails vs using a jig to machine them with a router. I like the look of hand cut dovetails, and given the time it takes to set up a jig, it's just as fast to hand cut the joint.

All the measuring is done by using a marking gauge, a square to transfer lines, and eyeball judgement. I use a pencil to mark the tails, and a awl to scribe the lines for the pins. I use a dovetail saw to make the vertical cuts, then use a chisel to chop out the waste leaving my lines. I use my chisel as a layout tool to mark the ends of the pins. By using that chisel as a dimension, I know the chisel will fit in the joint making chopping a breeze. Speaking of making chisel work a breeze, I kind of think a chisel is useless unless it's sharp enough to shave hair off of ones arm. When sharpening my chisels and planes, I start with an oil stone, then finish the task using Japanese water stones. The last stone I use puts a mirror finish on the edge. I don't have a strop, but I will use the side of my leather work boot to finish the edge. A nice sharp chisel makes a great sound as you use it to pare away a few thousandths of hard wood.

I could have picked an easier piece of wood to hand dovetail. The highly figured wood comes with price in that it's extremely dense with no rhyme or reason to how the grain runs. A razor sharp chisel is a crucial piece to the puzzle of getting this small job done without wasting ones time.

The weather is starting to go downhill so I'm expecting work to start slowing down in the next few weeks. I'd like to be finished with the bulk of the master cabin within the next four weeks, and to be honest with you, I think that's doable. I'm kind of down to punch out type jobs and wrapping up some loose ends, so given that to do list, I think I'll put in another order for the rest of the plywood to finish the hallway, head, and kids bunk room.

My goal is to have the wood work for all the rooms complete by the time spring hits. I've started to put a dent in my stock pile of cherry lumber, and while I think I have enough to complete the Salon, I'm getting a little nervous. Now that the sap is down in our trees, I have five or six nice cherry's I think I'm going to harvest. One of the trees is going to be nothing but curly grain, and I think I'll use that to build the panel doors for the galley cabinets and the panels for the wheel house helm. I'll be needing that lumber by next winter, so I might need to do something drastic like building a small solar kiln to speed things up.

Friday, November 26, 2010

Bow Thruster


If you ever look out in harbor some day and see a trawler that hopefully looks like the picture on my header. And if that trawler is in the middle of the harbor fairway doing doughnuts, you can have this baby to thank for that ability.

As posted earlier on fabricating the bow thruster tube, I'm going to have a bow thruster on my boat. My thruster is hydraulic and will run off of the live PTO on the main engine. Because the thruster is hydraulic, I can run the thing 24/7 if I want to. I don't have to worry about it over heating, or batteries going dead, solenoids failing, wire corrosion, bad connectors... you get my drift. I understand why most folks go with the electric thrusters, but in my opinion, the electric units are a distant second place to a hydraulic unit.

Fluid power is bullet proof, idiot proof, and lasts a stinking long time with extremely low maintenance. The best thing about hydraulic powered equipment, is that it's there when you need it with power to spare for as long as you need power.

This unit was built by Key Power Equipment, and I can't say enough good things about those folks. There's a link on this page if you want to contact them.

Saturday, November 20, 2010

Master cabin cabinet doors


If you're ever in the market to get your fingers bobbed, grab a six pack of tall boys and come on over to my shop where you can play around with the wood shaper. The wood shaper has a 3 hp motor and whirls some heavy bits around at 12,000 rpm. The sound made by the bits spinning is almost as impressive as the wood that pukes out the discharge shoot. The shaper is a nice tool I bought about 20 years ago while I was renovating house's, and it's becoming quite the handy item on the big boat build.

The doors I built for the three cabinets in the master cabin are straight forward cabinet style doors. They are what I'd call frame and panel doors consisting of styles and rail pieces with a raised panel. These doors are overlay doors meaning the sit on top of the cabinets face frame vs a flush door that would fit within the face frame. Overlay doors are much easier to build and require a tenth of the precision that flush doors require. The method of joinery I'm using is called cope and stick. Basically one cuts a grooved profile in the panel side of all the styles and rails, then you cope the rail ( top and bottom horizontal pieces) to fit into that profile. The panel then floats in that frame you just created. It's a pretty nice looking door and adds a little more detail than one would get by using a flat plywood panel.

I've built some doors for some other projects lately, and on those projects I used 1/4" plywood for the panels. On the boat build, I've decided to invest more of my time and build raised panels for all the cabinets ( well at least the cabinets in the master cabin and probably the galley). Because the raise panel is a solid wood panel, I had to build the doors to allow for seasonal movement of the panel. The air is pretty dry here now that we are in the late fall time, so if fit the panel on the loose side. I gave myself 1/4" gap all around the panel to allow the panel to "float" within the frame. I cut some pieces of 1/4" foam backer rod and stuffed the backer rod in to the groove of the style and rail before I assembled the door. The backer rod holds the panel centered in the frame while allowing it to expand and contract as humidity changes. After I get all the finish on the doors, I might go back and put a dab of glue in the center of the rail @ the center of the panel. Since wood expands across the grain, a little bit of glue at this location will allow the panel to expand while helping with any rattle I might get when the door closes. If one would glue the panel tight all the way around the style and rail frame, it wouldn't be long before the expanding panel would destroy the frame. Before I assembled the doors I put a coat of finish on all the panels. If I didn't finish the panel prior to assembly, a line of unfinished wood would show up once the panel started to expand or contract. I clamped some boards to the edge of the work bench to help keep the doors square while I assembled them. I then checked the diagonals to assure the door was perfectly square before I clamped them.

After I assembled the doors, I gave each door three coats of urethane sanding with 320 grit between coats. I used a self closing hinge that holds the door shut. I don't think I'll put much faith in these hinge's holding the door shut once the boat experiences some weather, so I'll install some catches' of some style to make sure the doors stay shut. While the drawers have no pull hardware, I'm thinking of installing some pulls on the doors.

Sunday, November 14, 2010

Dutchman


After edge gluing the boards that are to be the top to the sink base for the master cabin, I soon realized the top had some flaws. I had already cut the top to size and had routed the sink cut out, and because of the work I had invested, I decided to make use of the flaws in the wood.

The top had a few knots in it, and after looking at them with a little more thought to the long term viability, I decided the knots might not stay put. I knew of the knots before I had glued the boards, but I thought they were live branch knots vs dead branch knots. Two of the knots were questionable, and one was for sure a dead branch knot. Dead branch knots tend to fall out of the wood at some point while live branch knots usually stay put. I decided that on this piece, I would deal with the knots by inlaying a repair I've always called a Dutchman.

A Dutchman is a piece wood inlay that replaces the defect. The idea behind the Dutchman is that it is a legitimate repair that adds character to the wood. If you can't make a wood joint invisible, you should highlight the joint is another way to look at this type of repair. The Dutchman type repair seems to have lost it's appeal with the wide spread use of plywood and it's near defect free surface, but one can find these inlay repairs on lots of early period furniture.

To make the Dutchman, I first made a couple of templates that I would use to shape the inlay pieces. There is no rhyme or reason to the shape of the inlay, so I just went with whatever popped into my head. The easiest and fastest way for me to do inlay work like this is by using my router. Once the templates are cut, I use an inlay tool that works with the router. I clamp the template over the piece to receive the inlay, and route out the shape. I then remove a bushing on the inlay tool, and using the same template, route the inlay piece in a scrap piece of wood. I part the inlay piece off of the scrap wood using the table saw. A little sanding on the edge's, brush on some glue, then tap the inlay piece into the recess with a dead blow mallet. A perfect fit every time. I then sand the inlay flush using an air powered dual action sander.

Some people need to have a flawless piece of work, but I kind of like the character that a few knots or a repair such as a Dutchman adds to some of my work. I really like the occasional knot as long as I'm sure it will not drop out. But if one thinks the knot is in jeopardy, I think a Dutchman is a legitimate solution.

Wednesday, November 3, 2010

Drawers Complete


I have the drawers finished and fitted in the case.

I decided to put some urethane finish on the bed, drawers, and hull liner to protect the wood while I work in the master cabin. The wood gets stained, oil spots from my air tools, and like things are going to cause me more work, hence the finishing work. I've got some of the drawers filled with some tools, screw selection and other odds and ends that I'm using while I build the master cabin. Storage is a good thing. I fitted the plywood support for the mattress, so now I have a large platform I can use as a work bench.

If I had the drawer project to do all over again ( actually, I will as I work my way through the boat), the only thing I'll do different will be to modify the locking notch in the drawers, and use a little tighter fit between the drawer side and the drawer case. Other than that, I'm good with the design.

I'm going to build the sink vanity, my cabinet and desk, and the doors for the three cabinets that are in the master cabin. Once those builds are complete, I'm going to sheath the guest cabin and bathroom, then build out those two rooms.

I'm still in the dark as to what type of ceiling I'm going to put in these three rooms. I have been leaning towards beaded board ceilings painted white, but I'm not sure. I've framed the ceilings with the intention of a beaded board ceiling, but I'd like to explore more typical head liner material. If anyone has any experience with installing cloth head liner material, let me know what you think. I won't be installing any of the ceiling panels until the end of the build due to work that has to be done in those areas.