Friday, November 26, 2010

Bow Thruster


If you ever look out in harbor some day and see a trawler that hopefully looks like the picture on my header. And if that trawler is in the middle of the harbor fairway doing doughnuts, you can have this baby to thank for that ability.

As posted earlier on fabricating the bow thruster tube, I'm going to have a bow thruster on my boat. My thruster is hydraulic and will run off of the live PTO on the main engine. Because the thruster is hydraulic, I can run the thing 24/7 if I want to. I don't have to worry about it over heating, or batteries going dead, solenoids failing, wire corrosion, bad connectors... you get my drift. I understand why most folks go with the electric thrusters, but in my opinion, the electric units are a distant second place to a hydraulic unit.

Fluid power is bullet proof, idiot proof, and lasts a stinking long time with extremely low maintenance. The best thing about hydraulic powered equipment, is that it's there when you need it with power to spare for as long as you need power.

This unit was built by Key Power Equipment, and I can't say enough good things about those folks. There's a link on this page if you want to contact them.

Saturday, November 20, 2010

Master cabin cabinet doors


If you're ever in the market to get your fingers bobbed, grab a six pack of tall boys and come on over to my shop where you can play around with the wood shaper. The wood shaper has a 3 hp motor and whirls some heavy bits around at 12,000 rpm. The sound made by the bits spinning is almost as impressive as the wood that pukes out the discharge shoot. The shaper is a nice tool I bought about 20 years ago while I was renovating house's, and it's becoming quite the handy item on the big boat build.

The doors I built for the three cabinets in the master cabin are straight forward cabinet style doors. They are what I'd call frame and panel doors consisting of styles and rail pieces with a raised panel. These doors are overlay doors meaning the sit on top of the cabinets face frame vs a flush door that would fit within the face frame. Overlay doors are much easier to build and require a tenth of the precision that flush doors require. The method of joinery I'm using is called cope and stick. Basically one cuts a grooved profile in the panel side of all the styles and rails, then you cope the rail ( top and bottom horizontal pieces) to fit into that profile. The panel then floats in that frame you just created. It's a pretty nice looking door and adds a little more detail than one would get by using a flat plywood panel.

I've built some doors for some other projects lately, and on those projects I used 1/4" plywood for the panels. On the boat build, I've decided to invest more of my time and build raised panels for all the cabinets ( well at least the cabinets in the master cabin and probably the galley). Because the raise panel is a solid wood panel, I had to build the doors to allow for seasonal movement of the panel. The air is pretty dry here now that we are in the late fall time, so if fit the panel on the loose side. I gave myself 1/4" gap all around the panel to allow the panel to "float" within the frame. I cut some pieces of 1/4" foam backer rod and stuffed the backer rod in to the groove of the style and rail before I assembled the door. The backer rod holds the panel centered in the frame while allowing it to expand and contract as humidity changes. After I get all the finish on the doors, I might go back and put a dab of glue in the center of the rail @ the center of the panel. Since wood expands across the grain, a little bit of glue at this location will allow the panel to expand while helping with any rattle I might get when the door closes. If one would glue the panel tight all the way around the style and rail frame, it wouldn't be long before the expanding panel would destroy the frame. Before I assembled the doors I put a coat of finish on all the panels. If I didn't finish the panel prior to assembly, a line of unfinished wood would show up once the panel started to expand or contract. I clamped some boards to the edge of the work bench to help keep the doors square while I assembled them. I then checked the diagonals to assure the door was perfectly square before I clamped them.

After I assembled the doors, I gave each door three coats of urethane sanding with 320 grit between coats. I used a self closing hinge that holds the door shut. I don't think I'll put much faith in these hinge's holding the door shut once the boat experiences some weather, so I'll install some catches' of some style to make sure the doors stay shut. While the drawers have no pull hardware, I'm thinking of installing some pulls on the doors.

Sunday, November 14, 2010

Dutchman


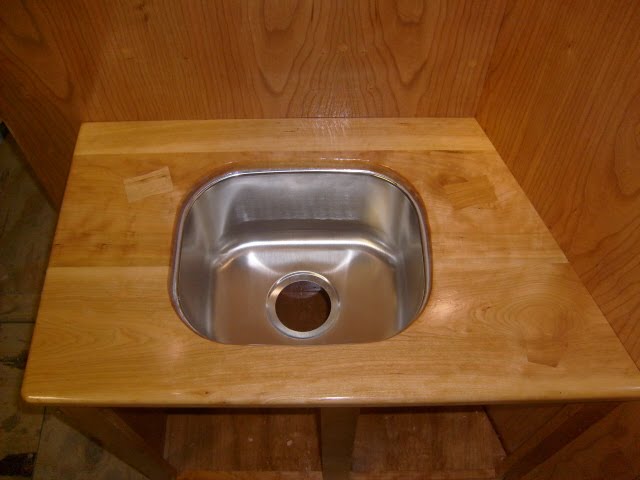
After edge gluing the boards that are to be the top to the sink base for the master cabin, I soon realized the top had some flaws. I had already cut the top to size and had routed the sink cut out, and because of the work I had invested, I decided to make use of the flaws in the wood.

The top had a few knots in it, and after looking at them with a little more thought to the long term viability, I decided the knots might not stay put. I knew of the knots before I had glued the boards, but I thought they were live branch knots vs dead branch knots. Two of the knots were questionable, and one was for sure a dead branch knot. Dead branch knots tend to fall out of the wood at some point while live branch knots usually stay put. I decided that on this piece, I would deal with the knots by inlaying a repair I've always called a Dutchman.

A Dutchman is a piece wood inlay that replaces the defect. The idea behind the Dutchman is that it is a legitimate repair that adds character to the wood. If you can't make a wood joint invisible, you should highlight the joint is another way to look at this type of repair. The Dutchman type repair seems to have lost it's appeal with the wide spread use of plywood and it's near defect free surface, but one can find these inlay repairs on lots of early period furniture.

To make the Dutchman, I first made a couple of templates that I would use to shape the inlay pieces. There is no rhyme or reason to the shape of the inlay, so I just went with whatever popped into my head. The easiest and fastest way for me to do inlay work like this is by using my router. Once the templates are cut, I use an inlay tool that works with the router. I clamp the template over the piece to receive the inlay, and route out the shape. I then remove a bushing on the inlay tool, and using the same template, route the inlay piece in a scrap piece of wood. I part the inlay piece off of the scrap wood using the table saw. A little sanding on the edge's, brush on some glue, then tap the inlay piece into the recess with a dead blow mallet. A perfect fit every time. I then sand the inlay flush using an air powered dual action sander.

Some people need to have a flawless piece of work, but I kind of like the character that a few knots or a repair such as a Dutchman adds to some of my work. I really like the occasional knot as long as I'm sure it will not drop out. But if one thinks the knot is in jeopardy, I think a Dutchman is a legitimate solution.

Wednesday, November 3, 2010

Drawers Complete


I have the drawers finished and fitted in the case.

I decided to put some urethane finish on the bed, drawers, and hull liner to protect the wood while I work in the master cabin. The wood gets stained, oil spots from my air tools, and like things are going to cause me more work, hence the finishing work. I've got some of the drawers filled with some tools, screw selection and other odds and ends that I'm using while I build the master cabin. Storage is a good thing. I fitted the plywood support for the mattress, so now I have a large platform I can use as a work bench.

If I had the drawer project to do all over again ( actually, I will as I work my way through the boat), the only thing I'll do different will be to modify the locking notch in the drawers, and use a little tighter fit between the drawer side and the drawer case. Other than that, I'm good with the design.

I'm going to build the sink vanity, my cabinet and desk, and the doors for the three cabinets that are in the master cabin. Once those builds are complete, I'm going to sheath the guest cabin and bathroom, then build out those two rooms.

I'm still in the dark as to what type of ceiling I'm going to put in these three rooms. I have been leaning towards beaded board ceilings painted white, but I'm not sure. I've framed the ceilings with the intention of a beaded board ceiling, but I'd like to explore more typical head liner material. If anyone has any experience with installing cloth head liner material, let me know what you think. I won't be installing any of the ceiling panels until the end of the build due to work that has to be done in those areas.

Monday, October 25, 2010

Drawers


My drawer count at press time stands at 15 drawers in the master cabin: 12 under the bed, and three more at Shannon's dressing/vanity table. We've got a fairly large kitchen at our house, and we only have nine drawers in that kitchen. Needless to say, I'm getting all pumped up at how much storage space I'm squeezing into the master cabin.

I copied the drawer design that is on our 28' Carver cruiser boat. That design has served that boat well for 33 years with no failures. The design is extremely simple and uses no expensive hardware. I had thought about using metal slides with bearings, but given the odd size of the drawer depth, too much modification would have to happen to the parts. I also wasn't to psyched about dropping $200.00 on hardware that I would have to modify. So I went with a sliding dovetail to connect the drawer front to the drawer sides, an plastic guide that rides in a shop built hardwood track. The fronts are solid Cherry, the sides are 1/2" Cherry plywood left over from the paneling, the bottom is 1/4" Birch, and the back is more of the 1/2" Cherry ply. I had quite a nice pile of Cherry plywood scrap left over from paneling the master cabin, and the drawer project pretty much wiped out what I had left. These drawers are an overlay design.

I had to sort of think like a production guy and try to mass produce my parts for this rather large job. The first step was to measure all the rough openings and label them 1-15. I then developed a cut list for the fronts and sides. Once the fronts and sides were milled and cut I laid out where the sliding dovetail socket would be located. I laid out the dovetail so that there would be 3/16" of a gap between the side of the drawer and the face frame of the drawer chest. 3/16" is a little more gap than I would prefer, but I can always go back and install a filler piece if I feel the drawer wanders to much while opening or closing. Given that this is all wood, I have to give myself a little cushion with the expansion and contraction that is going to happen. I'd rather err on caution.

The first cut I made was the dovetail socket in the drawer front. I did this work on my home made router table/ glorified box that I can hang my router off of. The real money maker on my home made router table is the fact that I borrow the fence off of my shaper witch gives the router table a fine level of accuracy. Being able to micro adjust the fence gives me quite a level of precision for this type of work. The next cut was to route the dovetail pins in the drawer sides. This cut is where the micro adjustable fence comes in handy. Once all the socket and pins were machined I laid out and machined the 1/4" grooves for the bottom to ride in. The next cut was to machine a dado in the drawer side to accept the drawer back. The final cut was a 3/4" x 1/4" deep dado on the bottom of the drawer sides where the side meets the drawer front. This dado is what causes the drawer to drop over the face frame when closed, thus preventing the drawer from opening when things start rocking and rolling. I machined all the grooves and dado cuts using my table saw and a Freud dado set.

The assembly went pretty quick... about 20 minutes per drawer. Once I was ready to assemble, I measured for the drawer bottom and drawer back, then cut these two last parts. I sanded the insides of all the drawer parts with 220 right before I assembled. I applied glue to all the dovetail pins and glue to the dado that holds the back. I then slid the drawer side into the drawer front. I machined the dovetails so that I would have to only tap them home with my fist vs having to drive them with a mallet. Even with that tolerance, once the glue was applied I did have to persuade a few with a dead blow mallet. I then slid the bottom piece into the grooves, slid the drawer back into the dado, used a bar clamp to pull the sides tight against the back, then pinned the sides to the back with my pneumatic brad nail gun using 1" brads. I then laid the drawer upside down on the bench, checked the diagonals, then pinned the bottom to the back. The final step was to wipe off any glue.

I've yet to decide what kind of pull I'm going to use. Since I'm on a budget, I think I'm going to route a finger pull on the inside bottom edge of the drawer for a pull. A cove bit is what I've got in mind. I'm still going to look at store bought pulls, but I'd rather save the money. Having been in residential construction all my career, I've kind of learned a lesson watching others build houses they cannot afford. " It's easy to spend it early". I've seen too many people get in pissing matches with their builder because they blew their wad too early in the game. I kind of like the flush look with now hardware on the drawer face.

I'm going to get a few coats of finish on the drawers before I install them. I'll attach the plastic guide, then make sure the drawer fits. I designed the rail so that the plastic guide sits 3/4 above the rail. I figure I'll have to do a little block plane work on some of the rails to loosen up the rail/guide fit so it's not an interference fit.

Anyway, the drawer build was a pretty big job and I'm glad I've got it behind me. I've got to build my desk and cabinet, then I've got to build the sink base for the master cabin sink. Once I've got those last three jobs finished, I'll bung all the screw holes and get some finish on things to start protecting the wood.

I decided to rout a finger pull in the drawer fronts. The more I thought about it, the more I felt a finger pull would fit well with the look of the cabin. I'll probably do the same finger pull on the cabinet doors. I used a 1/2" cove bit with a bearing to route the pull. The pull feels fine on the prototype drawer, and with it's 3" length, ones fingers find it easily. On the larger drawers, I routed two pulls.

Thursday, October 21, 2010

Master Cabin Bed


I'm working on the bed in the master cabin, and I feel as if I'm making some good progress.

The face frames for the drawers ( 12 drawers) is complete as is the panel foot board. I used plywood for the center partition on the bed so I'd have a place to hang the drawer guide off of. I framed the mattress support out of 1 3/4" stock using pocket screws. While the bed is becoming a stout piece of furniture, everything about the bed is modular and able to be taken apart in relatively large pieces. I could probably dis-assemble the whole thing in about 1/2 of an hour.

The mattress support and bed rail are cantilever over the chest of drawers by about 4". This has proven to be a nice detail as it lets you get right against the bed while not having your toes hit the drawers. It just makes the room feel more comfortable. The cantilever also made the bed/drawers attachment much easier along with fabricating the radius. Because I now have wires in the head board, it would not be too difficult to incorporate some small LED lights in the cantilever to illuminate the drawers if the lighting needed to be improved to see into the drawers.

The outside rail for the bed finished out at 5" tall. I used pocket screws to assemble the two bent laminated pieces to the rail sections and I'm extremely happy with how the joints look. Ignoring the difference in the grain, one would be hard pressed to see the joint itself. I used three pocket screws per joint, and I also applied a little glue to each piece. The bed rail is extremely rigid, and while one would have to be careful if it ever had to be removed, the piece would fit through either the engine room door, or the door to the head and into the guest cabin.

I held the bed rail down 3/4 " below the mattress support framing. I've always figured on using an 8" foam mattress, but sitting on the rail, and looking at how other things are fitting together, I could probably get away with a 6" tall mattress.

I incorporated a book shelf of sorts into the head board, along with a place to have two LED reading lights. Instead of robbing the natural light from the port lights, we decided to not have a top shelf on the book case/headboard so light would have an easier time getting past the book case. I fabricated a fiddle to the base of the book case, and one rail across the front to hold in whatever gets put on the shelf. The reading lights, with their 3" base, will fit between the fiddle and the rail.

The reading lights were originally going to be installed on the hull liner above the book case shelf. I ordered some lights with a long flexible neck, and after putting them up on the liner, I felt that the looked like crap. I scrapped that design, and had to come up with a better location. Putting the lights on the head board would have made them too close to the pillow, so I built three mini columns for a place to install the lights. The mini columns turned into a support bracket for the book case rail, so this is how the book case came to be. I had to fix my screw up with the wire location, so I cut a dado in some stock, and made a wire chase that I screwed to the hull liner. The wood wire chase's look OK, and was a much better alternative to removing the hull liner and pulling new wire.

Building of all the drawers that will reside in the master cabin is the next item on the to do list.

Saturday, October 16, 2010

Bending wood

I'm still doing wood work in the master cabin, and I've been focusing in the bed.

The bed sits on a chest of drawers ( twelve drawers in total). Because our sink is in the master cabin, the walking path between the bed and sink needed to be "just so" in order for me to feel comfortable walking between the two. I moved the bed aft off the center line about 7 inches. The other design feature I wanted to build into the bed was having radius corners at the foot board to help navigate between the sink and the bed. It's amazing how more comfortable it is to walk past a radius corner vs a right angle corner. This, like other projects on the boat, is a fight for inches.

My first inclination was to cut multiple kerfs in the radius pieces to achieve the bend. Because one will see those kerf cuts, I decided not to go that route. I decided to laminate multiple pieces together and bend them around a form.

I re sawed stock into 1/8" staves to get the pieces I would need to do the laminating. I had problems cold bending the staves so I decided to steam bend them with a thrown together steamer and steam box.

I built the steamer out of a piece of square tubing witch I fabricated a base, a lid, and a nipple to accept a piece of radiator hose. The steam box was built out of duct tape and some old 2" rigid insulation I had laying around. I drilled some 1/4" holes in the side of the box to insert welding rods to make shelves for the lumber to sit on. My wife's meat thermometer put a high tech look to the whole contraption.

Once the box got up to 212 degrees, it only took about 20 minutes for the wood to act like a piece of rubber. I had to work quick to get the glue on then get the pieces bent around the form. Another person sure would have been handy, but I managed to pull it off.