
The fresh water system is complete and ready to use. Once I finish the shower tile and connect the drains to the two sinks I have installed, I think I'll add a few gallons of water to tank #1 and test the system.
I have eight stainless water tanks under the forward sole of the boat. The tanks primarily reside in the master cabin and kids dressing room between station #9 and #5. Total capacity of the tanks are about 370 gallons. There are no tanks under the bathroom or kids cabin.
My plan for having 8 water t
 anks was for obvious reasons to fit them under the sole between frames and get as much fresh water on board as I could. To prevent one tank failure from taking the water system off line, I provided a shut off valve for each tank. The tanks are connected in series, so this required a valve at the tank along with "T" connections. Because I wanted to have the ability to take any one tank off line, I manifolded the vent lines and fill lines together on both the port and starboard side. I have a one fill and vent manifold on both the port and starboard side of the boat. I can close any one vent or fill line via a valve at the respective manifold to totally isolate any one tank. The vent lines are 3/4" from the tank and connect together via a 1" manifold that leads above deck. The fill lines are 1 1/2" that lead to an 1 1/2" manifold that reduce down to 1 1/4" leading towards each tank. I used flexible sch. 40 PVC for the most of the fill lines and 3/4" rubber push lock hose f
 or the vents. All the manifolds and fittings are rigid, sch. 40 PVC with pressure fittings. The picture showing the fill manifold also shows my engine room bilge pump and forward cabin bilge pump discharge lines. The bilge pump are 1 1/2" discharge. The overboard discharge for galley sink is just forward of the bilge pump discharge's. In this picture, the galley sink discharge is not connected yet, but you can see the fitting, painted white, welded in to the hull. This is a busy area of the boat with a lot of piping between station #9 @ # 8.
The series connections for the tanks happen in the bilge area at the center longitudinal frame of the boat. The common line manifolds together forward of station #9, which is the water tight bulkhead separating the engin
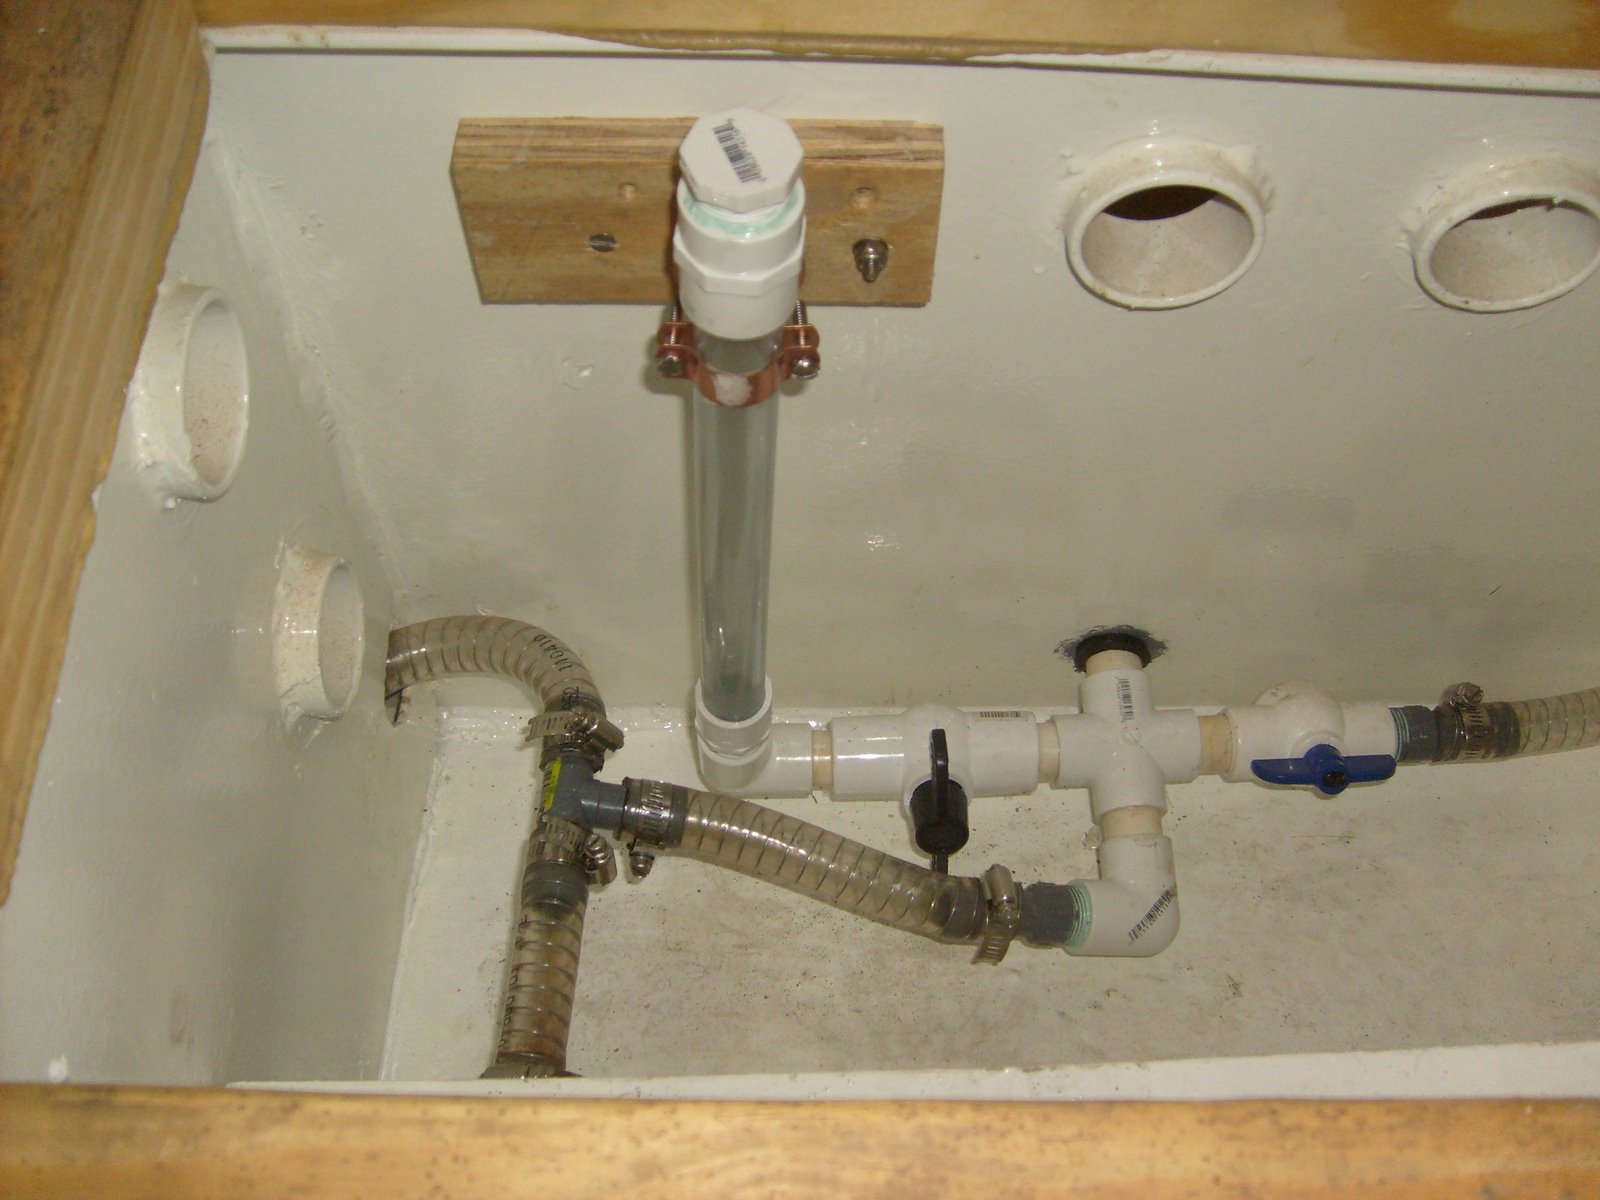 e room from the master cabin. The now manifolded lines pass through the water tight bulkhead via a water tight seal and the now one line enters the engine room where the pressure pump resides. In order to keep an eye on the water level in the tanks, I made a simple sight gauge out of clear SCH. 40 PVC. By closing the valve leading to the pump and opening the valve leading to the sight gauge, I can see the liquid level in the tanks. I have a threaded cap on top of the site gauge I'll have to loosen to let air out of the gauge to get an accurate reading. The gauge is easily accessible by removing a sole panel. The gauge is threaded into a "ELL" fitting and is easily removed for cleaning or replacing.
The pressurized supply line travels under the engine room sole where it passes through another water tight bulkhead via another water tight seal and ends up in the lazarette where the water is distributed to the rest of the boat via a PEX distribution manifold.
I used a home style water heater that hangs from a bracket on the wall. The water heater uses a 1500 watt element, so it will pu
 ll 12.5 amps @ 120 volt. I'm going to leave this device off of the inverter circuit, and commit to using the generator when I need to make hot water. The tank is 8 gallons, so we will be able to store enough hot water for hand washing and dish washing. When we want hot showers, we'll have to fire up the generator. I do not trust the wall hanging bracket to hold the water heater fast in many boating situations, so I'm going to strap it to the wall with some sort of straps.
I located the pressure pump in the engine room under the work bench and below the steering hydraulic reservoir. This location is still easy to get to regarding maintenance, but it was not my first choice. I ca
 n easily sit on the engine room floor and do any service work or repair to the pump without having to get in any contorted position. All through the build, I've been trying to build with maintenance and repair in mind, and I don't want to design or build any system that requires a contortionist to work on things. I decided to use a moderate priced pump system that was sold as a unit. The unit is four GPM with the cut off switch set for 45 psi and the cut in set at 30 psi. There is an inline strainer before the pump and a small accumulator tank after the pump. I would have liked to have a little larger accumulator tank, but we'll just have to see how this unit performs. The accumulator tank is a tank with a bladder in it that stores water pressure so the pump does not have to run every time the cold water is turned on.
I used 3/4" potable water grade suction hose with stainless wire in it for the suction side of the pump, and 1/2" PEX for all the pressure side. The suction hose is fitted with barb fittings and hose clamps. I'd prefer to have compression fittings, but hose clamps seem to work better in the bilge space and they are less expensive. Because of the mounting issue of the hot water heater, I added bronze unions to make the water heater removal a quick and easy job. I also added quick release fittings at the pressure pump to make pump removal easy.


No comments:
Post a Comment